Tuesday, May 28, 2019

DIY Sweet and Flowery Gel Wax Candle + Bloopers, Tips and Tricks!


Gel wax candles are gorgeous, especially if you’re looking to make candles that appear like water and have flowers suspended in them. However, gel wax is incredibly tricky to work with and we learned the hard way about some things you should and shouldn’t do when making gel wax candles.
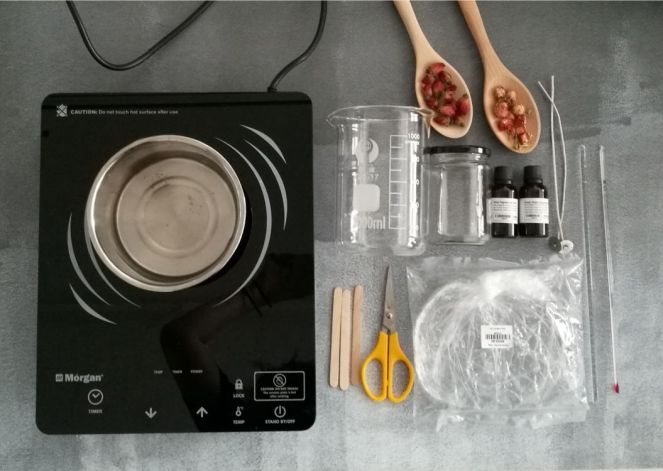
But before we share all the do’s and don’t’s, here’s what you need to make your very own dreamy, Sweet and Flowery Gel Wax Candle:
IMG_20190419_142431
  1. Clear Gel Wax ðŸ‘‰ We used this High Density Clear Gel Wax – 500g !
  2. Zinc Wick ðŸ‘‰ We used this Eco-6 Candle Wick – 8 Inches instead, BUT you might not want to as well, find out why at the [*Notes] section for Step 2 of Method 1.
  3. A Glass Jar ðŸ‘‰ We used this 350ml Clear Round Glass Jar with Black Cap.
  4. Honey Fragrance Oil
  5. Flower Water Fragrance Oil
  6. Dried Rose Bud ðŸ‘‰ We used this here.
  7. Dried Amaranth Globe Flower ðŸ‘‰ We used this here.
  8. Glass Thermometer – 200°C
  9. Glass Rod
  10. Scissors
  11. Popsicle sticks
  12. Elastic Band
  13. Double Boiler (for Method 1 only)
  14. Stove
  15. Heat Gun (for Method 2 only) ðŸ‘‰ We used a 2000w Ryobi Heat Gun
  16. Thick Cloth/Mittens (this is especially needed if you’re doing what we did at [Method 2].)
  17. Powder Free Latex Gloves (for those who hate washing their hands multiple times when handling gel wax)

Instructions

Method 1 – The Double Boiler (the BEST method)
1. Gel wax melts at 80+°C. For those who are impatient, make sure to break the gel wax into multiple smaller pieces to help speed up the melting process (do not stir while melting as this may introduce air bubbles into the gel wax!). The first time we did this, we broke them into three palm-sized pieces and that took more than an hour to melt.
IMG_20190419_145330
2. While the gel wax is melting, secure a wick to your container. We recommend not using super glue, glue dots or hot glue as they may melt and cause your wick to float when you’re pouring in the melted gel wax. Instead, you can secure your wick as shown below:
IMG_20190419_143432
*NOTES: Don’t use a wick that’s pre-coated with wax of any kind. A wax-covered wick will cause a cloud in the gel and it will not have a clear finish.
3. The gel wax is ready to be poured when it reaches around 94-104°C. Turn off the heat and add in your choice of fragrance oil. Here, we added 10 drops of flower water fragrance oil and 5 drops of honey fragrance oil for our 350g gel wax candle and the scent was strong.
*NOTES: 
a) The colour of your fragrance oil can affect the colour of the gel wax.
b) Adding fragrance oil to wax above the flashpoint will not cause it to combust.
4. Stir well but gently with the glass rod so that the fragrance oil is evenly dispersed in the melted gel wax.
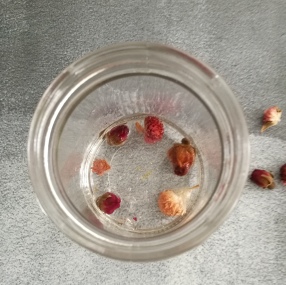
bty5. Pour a little gel wax into the container, place some dried flowers on it, and pour another layer of gel wax. Do this until you’ve reached near the top of your container.
*NOTE: We don’t recommend pouring all the melted gel wax in first and then, pushing the dried flowers in to submerge them. This is because more fine bubbles will form and the flowers are more likely to float back up to the surface as well. (A picture showing the difference between layering and submerging the flowers can be found down below).
6. Snip your wick about 1cm taller than the gel wax. Then, let the candle cool and cure at one side for 1 to 2 days.
~*~
bty
On the left: Result of Method 1. We used a wax-coated wick which resulted in cloudiness, and we also pushed the flowers in to submerge them which resulted in lots of fine bubbles.
On the Right: Result of Method 2. We don’t recommend this method to those who are making candles to be used and not just for decorative purposes. Our wick burnt and there are a lot of huge bubbles, though they do provide a nice visual.
~*~
Method 2 – The Heat Gun (quicker but not the best way, lots of bloopers!)
1. Like in Method 1, break the gel wax into small pieces. Make sure your wick is secured to your jar before filling the bottom of the container like so:
bty
*NOTE: Make sure your jar can withstand high temperatures for this method!!
2. Melt the first layer of gel wax using a heat gun. Ours is of industrial strength and this was not a good thing because our wax-covered wick ended up burning. We’re not sure if a weaker heat gun would result in the same thing, though.
bty
3. Add a drop of honey fragrance oil and flower water fragrance oil into the melted layer of gel wax. Gently stir to evenly distribute the fragrance oils.
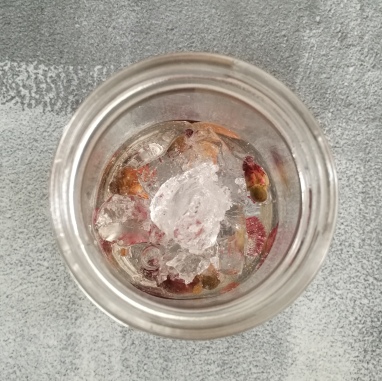
4. Place some dried flowers on the melted layer of gel wax before placing a layer of un-melted gel wax on top of them. Ensure that the un-melted gel wax completely covers the dried flowers in order to avoid burning or darkening.
bty
5. Repeat steps 3 and 4 until you’ve reached near the top of the jar.
6. Let the (non-)candle cool and cure at one side for 1 to 2 days.
*NOTE: We tried to pierce through the gel wax to insert a wick before we did step 6 but it just didn’t work out well.

This tutorial is honestly a mess but we couldn’t not share what we’ve learnt through our trials and errors with you. We’ll do an upgraded tutorial on the Sweet and Flowery Gel Wax Candle using Method 1 only, so please keep an eye out for that! ❤
happy crafting
Pssstwe're also available at Craftiviti.com!

Monday, May 27, 2019

Herbal Extracts and How to Make Them


Herbal extracts are brilliant for those who love using products that are as close to natural as possible. These extracts are very concentrated liquids in which a solvent is used to extract the herbal properties out of plant material.
Watch the video below to join Belinda Carli, Director of the Institute of Personal Care Science and Cosmetic Formulator, as she shares her knowledge on how to create home-crafted and self-preserving herbal extracts for use in personal care using a hot and cold process method!

Thank you Belinda Carli from Personal Care Formulations for sharing this video with us!
happy crafting
Pssstwe're also available at Craftiviti.com!

Saturday, May 25, 2019

Get to Know: Cold Process Soap


coconut-soap-with-floral-fragrance
Cold process soap is known as ‘natural soap’. It is made by combining oils and sodium hydroxide, through the cold process. This cold process denotes the lacking presence of heat when making soap.
The mixture of sodium hydroxide with a type of liquid (henceforth known as ‘lye’, as it is defined that ‘lye’ is an aqueous solution of sodium hydroxide or potassium hydroxide) is required for making soap. It is not possible to make soap without lye as lye is required to react with the oils to change them into soap. Without lye, you will only have a bunch of oils floating around in water.
*Melt and Pour soap has already been pre-saponified. The difference between a melt and pour soap and a cold process soap is that for cold process soap, one can customize all ingredients. Also, Melt and Pour soaps are usually made from a detergent formulated, cleansing cosmetic base and thus, have few SLS-free and all-natural options.
*Sodium hydroxide is used to makes bar soap. It forms a solid, opaque bar soap. Potassium hydroxide makes liquid soap, which is flowing, clear, or translucent. To read more about lye and how to handle it with proper care, check out this post by Soap Queen!
*There are also many kinds of oil. Soft oil (like rice bran oil and olive oil) will cause a soap to be mushy/soft. Hard oil (like palm oil and coconut oil) will harden it. Making soap requires a good balance of oils!
The process of lye reacting with oils and thus, resulting in soap, is a chemical reaction called saponification. Glycerin is also produced during this process and if you’ve super-fatted the soap, you will have unsaponified oil too. Saponification usually takes 24-48 hours to occur. However, it should be noted that saponification can be affected by surrounding temperature.
*Sodium hydroxide/potassium hydroxide should slowly and gradually be added into liquid and NOT the other way around!
30950762680_7e79c46ed2_bHeat quickens saponification. So, if the lye is extremely hot, it can cause the saponification process to speed up dramatically. This is problematic if the soap design involves a lot of layers, swirls and such. If the lye solution is too cold, it can solidify the oils and butters upon contact. It should be noted, however, that soaping temperature is based entirely on personal preference and will vary according to recipe. Thermometers are used based on the recipe/method/situation in cold process soap.
*The mixture of lye and oils can only be poured into mold when trace is present. Trace is the point when the oils and lye water are emulsified. At thin trace, there will be no streaks of oil and the soap will be the consistency of thin cake batter. Thus, oils separation cannot occur.
Bringing back the fact that saponification can be affected by surrounding temperate, the time during which saponification occurs is a crucial moment. Soap created with average or cool soaping temperatures can become quite hot if left in a warm or hot room after pouring into the mold. Hot room temperatures can cause soap to go through the gel phase or even overheat. Soaps also sweat due to high humidity environments and overheating. It is normal and will accumulate on the soap. On the other hand, when soap is on the cooler side, soda ash can form due to the natural process of unsaponified lye reacting with carbon dioxide.yellow-color-herbal-handmade-soap-bar-with-soap-bubbles_41657-53
After the saponification process is the curing process. Leaving the soap to cure allows the excess moisture to evaporate. It also results in a harder and milder bar of soap which also lasts longer. A cold process soap is at its best after at least a month of curing, and if you can leave it to cure for even longer, then it’ll be even better.
We hope this helps you understand Cold Process Soap better ❤
happy crafting

References:
  1. Coss, Melinda, Gourmet Soaps Made Easy (Cincinnati, Ohio: North Light Books, 2001).
  2. “Back To Basics: Lye Safety Guide – Soap Queen”, Soap Queen, 2015 <https://www.soapqueen.com/bath-and-body-tutorials/tips-and-tricks/back-to-basics-lye-safety-guide/&gt; [Accessed 14 April 2019].
Pssstwe're also available at Craftiviti.com!

Friday, May 24, 2019

How to Reduce White Rub-In Time in Emulsions


So, you know how you get that white rub-in when you’re applying creams or emulsions onto your skin? Like, when you’ve only just squeezed out a small blob of hand cream and it’s so little so you think it shouldn’t have that much white rub-in while you’re trying to get it absorbed into your skin?
Join Belinda Carli, Director of the Institute of Personal Care Science and Cosmetic Formulator, as she shows you how to overcome the formulation issue of excess rub-in time in natural and organic cosmetic emulsions, while still building plenty of luxurious viscosity and elegant skin feel in the finished product. Solve those cosmetic formulating issues with Belinda now, and enjoy your elegant emulsions so much faster, and easier, with the right know-how!

Thank you Belinda Carli from Personal Care Formulations for sharing this video with us!
happy crafting
Pssstwe're also available at Craftiviti.com!

Thursday, May 23, 2019

What are Floral Waxes?


So, the thing about floral waxes is that they are waxes and they smell like the flowers they’re derived from, yes? Well, contrary to their name, floral waxes are not actually waxes.
hold up
Are we pulling your leg here? Unfortunately, no.
You see, floral waxes are pseudo-waxes. That means they’re not genuine waxes. They’re faux waxes even though their INCI (International Nomenclature of Cosmetic Ingredients, “systematic names internationally recognized to identify cosmetic ingredients” [1]) name contains ‘cera’ or ‘wax’.
Some INCI names of waxes, whether pseudo-wax or actual wax:
  1. Beeswax – Cera Alba / Cera Flava
  2. Palm Wax – ‎Cera Elaeis Guineensis
  3. Rice Bran Wax – Oryza Sativa Cera / Oryza Sativa Bran Wax
  4. Rose Flower Wax – Rosa Damascene Flower Cera
  5. Ylang Ylang Flower Wax – Canaga Odorata Flower Cera

alice-in-wonderland-confusing
No worries if you’re confused because those were our initial sentiments as well. Hence, the birth of this post to help others understand what makes flower waxes pseudo-waxes and real waxes real waxes!
organic_yellow_beeswax_banner

Real Waxes, What Are They?

Natural waxes are organic compounds. They are a complex blend of alcohols, fatty acids and esters. They are derived from plants, produced by animals and occur in petroleum. Therefore, such waxes are are true waxes.
*Note: Waxes are typically available in different grades. They have varying colours, melting point ranges, physical forms, and even different purities. An example of this would be the beeswax we sell in our store, ranging from beexwax sheets to natural beeswax barsorganic beeswax pelletsrefined beeswax pellets from USA and refined beeswax pellets from China.
To paint a clearer picture, we’ll be using vegan waxes as a point of reference:
According to Formula Botanica, vegan waxes are derived from leaves, peels and fruits of different plants, or are separated from plant oils by de-waxing. The process involves physical separation and afterwards, they are normally purified and deodorized. The entirety of this process are physical procedures with no chemical reactions involved. However, the bleaching of these waxes may involve a chemical reaction. [2]
Types of vegan waxes include: Carnauba Wax, and Candelilla Wax.

Pseudo-Waxes, What Are They?

To know what pseudo-waxes are, particularly how floral wax is actually a pseudo wax, we must first know what an absolute is.
Absolutes are similar to essential oils. They are concentrated, highly aromatic oils that are extracted from plants. The difference between them and essential oils is the production process. While essential oils are produced via distillation, boiling or pressing, absolutes are produced through solvent extraction or enfleurage. [3]
After extracting the absolute, the remaining waxy mass of plant matter is still mildly fragrant. This remaining, mildly fragrant waxy mass is floral wax. In other words, floral waxes are waste products from floral absolute production.
1421904427-340576177_n
Source: pipi7149

Conclusion

Delving into how exactly different floral waxes and natural waxes are would require a lot more knowledge of chemistry but generally, the method of production natural waxes and floral waxes are different. As a comparison, both vegan waxes and floral waxes come from plants. However, vegan waxes are organic compounds while floral waxes are complexes of vegetable fats (triglycerides) and partial extracts of flowers. Therefore, floral waxes are pseudo-waxes.

Thank you all for reading!
We hope this post helps clear up some things, even just a little ❤
happy crafting


Pssstwe're also available at Craftiviti.com!
Wednesday, May 22, 2019

Get to Know: Preservatives in Cosmetics


Preservatives, whether synthetic or natural, are necessary in many personal care products. This is because personal care products usually have a pH level of around 5.5, which is compatible with not only the skin, but a variety of fungi and bacteria as well. Many personal care products also contain water and they are also enriched with extracts, plant oils, minerals and vitamins—all of which are fantastic the growth and survival of microorganisms.
In this following video, Belinda Carli mentions a few other reasons why preservatives are important in personal care products. She also sets some records straight regarding a few myths about preservatives in personal care products, ranging from certain essential oils, extracts and antioxidants having preservative properties, to whether products of certain pH levels require fungicidal protection/preservatives or not.
Watch now:

Thank you Belinda Carli from Personal Care Formulations for sharing this video with us!
happy crafting

Pssstwe're also available at Craftiviti.com!

Tuesday, May 21, 2019

DIY Refreshing Peppermint + Grapefruit Face Mist


With the temperatures rising these days, it’s tough to not turn on the air-conditioning or to take multiple showers in effort to cool down/stay cool. This, in return, isn’t friendly to the wallet and the environment and that is definitely a no-no.
So, today, we’re sharing our super easy and quick-to-do Refreshing Peppermint + Grapefruit Face Mist recipe so you can give yourself a nice cool down whenever you’d like!
Ingredients:
  1. Witch Hazel
  2. Distilled Water
  3. Peppermint Essential Oil
  4. Grapefruit Essential Oil
Other Tools Needed:
  1. Beaker
  2. Spoon
  3. 20ml spray bottle (you can find some in our store here)
IMG_20190324_162817_482

Instructions

1. Measure out 10ml of witch hazel and 10ml of distilled water. Pour both into your spray bottle.
2. Add in a drop of grapefruit essential oil and a drop of peppermint essential oil. Be careful not to add too much, especially if your essential oil is 100% pure!
3. Screw the top on and give it a good shake before spritzing away!

Notes:

*The lifespan of this mist is only 3 days as no preservative is used.
*The essential oil(s) used may eventually lose the potency of their scent and benefits due to oxidization.
happy crafting
Pssstwe're also available at Craftiviti.com!

Monday, May 20, 2019

We Got Featured on BFM!

Recently, the founders of Craftiviti got interviewed on BFM 89.9, which is a Malaysian independent business and current affairs-oriented radio station. It was a wonderful opportunity for Craftiviti on a whole, and we're super excited to this news here with everyone!
bfm

"You’ve seen the DIY posts on Pinterest where people can make anything from soap to candles to lipstick. Well, if you’ve ever wanted to give that a try, Craftiviti might be your new go-to place. The co-founders of Craftiviti, Eugene Tham and WeiYein Leong, share their entrepreneurial journey."
If you'd like to give this podcast a listen, click here!

happy crafting
Pssstwe're also available at Craftiviti.com!

Saturday, May 18, 2019

What are Natural Cosmetics?


In the world of personal care, it can be rather confusing trying to decipher what is natural and what is synthetic. This happens especially when you’re trying to find information about certain ingredients and end up with a bunch of conflicting results.
So, in the following video, Belinda Carli from Personal Care Formulations explores a couple of common production methods for natural and synthetic ingredients for personal care products. Among these ingredients are vegetable oils, extracts, and esters.

Thank you Belinda Carli from Personal Care Formulations for sharing this video with us!
happy crafting
Pssstwe're also available at Craftiviti.com!

JOIN US ON FACEBOOK