Showing posts with label Homemade skincare. Show all posts

Monday, October 14, 2019

How Plant Powders Are Made


In forms like extracts, oils and powders, plants have always been incorporated in skincare. For instance, rose is popular for being antibacterial, anti-inflammatory, and having antioxidants—usually infused in products meant to fight acne, reduce redness, boost moisture in skin. Orange is added for it’s richness in vitamin C which helps to even out your skin tone, and aloe vera is a known healing plant.
There’s also ginger root which can help stimulate blood circulation, and pine bark extract with it’s ability to increase hydration and elasticity of skin. So, it’s clear that when used in the right way, plants can do wonders for our skin!
Natural oraganic homemade soap making
For today’s blog post, we’ll be talking about how plant powders—one of the forms in which plants are incorporated into skincare—are made. Like how there is a variety of plant powders, there’s also a few ways to produce them.
~ * ~
moringa_powder1. Grinding into Fine Powder
Powders like green tea powder, mint powder and moringa leaf powder are made using the leaves of their plant which has been dried and then, ground into fine powders. This is also how some ginger root powders, flower powders (like lavender, rose, calendula, etc.) and a few others are made.
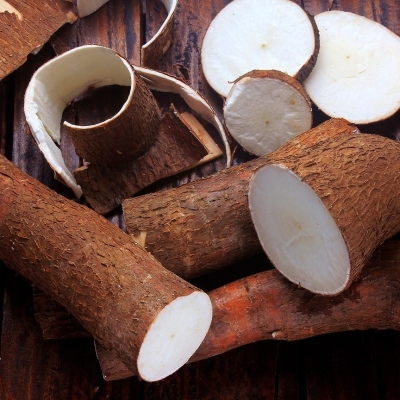
fresh cassava and peels and slices on rustic wooden table2. Starch Production
Certain plant powders like arrowroot powder are actually starch. These plant powders are made by separating the starch from plant root which has been cut and mashed into pulp. This pulp is strained through a screen to obtain fine starch which is then, dried and ground into fine powder.

3. Spray Drying
organic_strawberry_powder
While some powders like lemon powder and beetroot powder can be made by grinding the rind (for lemon) or the entire root (for beetroot), there’s another way for these powders to be made and that’s spray drying. This process involves spraying concentrated fruit juice in a chamber with hot air, allowing the droplets to dry before the dried particles are separated and filtered. Some of Craftiviti’s plant powders that are created through this process are Organic Lemon Powder, Organic Strawberry Powder and Organic Mango Powder.
~ * ~
Among the three, it can be said that plant powders made using the spray drying and grinding processes would hold the most nutrients and are therefore, more beneficial to us. However, this doesn’t mean that plants powders that are essentially starch, aren’t beneficial at all. All plant powders have their own pros and cons. So, depending on which formulation they’re incorporated in, they can either give your DIY personal care products a boost, or not.

Thanks for reading! We hope this helps ❤️

happy crafting
buy it

Wednesday, May 29, 2019

DIY Charcoal Masks


Charcoal masks are one of many darlings of the beauty and skincare world thanks to their cleansing abilities. However, commercial charcoal masks can be pretty pricey, so why not make your own (and be sure of what’s actually in your product)?
Join Belinda Carli, Director of the Institute of Personal Care Science and Cosmetic Formulator, as she shares her knowledge on what kind of charcoal is used to make charcoal masks, the benefits of charcoal to the skin, and how to create a charcoal mask formulation and finished product. Get dirty to get clean skin! Watch now ðŸ‘‡
Ingredients you’ll need:
  1. Distilled Water
  2. Xanthan Gum
  3. Refined Glycerin USP 99.5%
  4. Emulsifying Wax
  5. Lipid (a.k.a. unsaturated fats, such as butters [eg: shea butter] or carrier oils [eg: coconut oil])
  6. Activated Charcoal
  7. Preservatives (such as Liquid Germall Plus or Ecocert Tea Tree Extract)

Thank you Belinda Carli from Personal Care Formulations for sharing this video with us!
happy crafting
Pssst, we're also available at Craftiviti.com!

Monday, May 27, 2019

Herbal Extracts and How to Make Them


Herbal extracts are brilliant for those who love using products that are as close to natural as possible. These extracts are very concentrated liquids in which a solvent is used to extract the herbal properties out of plant material.
Watch the video below to join Belinda Carli, Director of the Institute of Personal Care Science and Cosmetic Formulator, as she shares her knowledge on how to create home-crafted and self-preserving herbal extracts for use in personal care using a hot and cold process method!

Thank you Belinda Carli from Personal Care Formulations for sharing this video with us!
happy crafting
Pssst, we're also available at Craftiviti.com!

Tuesday, May 21, 2019

DIY Refreshing Peppermint + Grapefruit Face Mist


With the temperatures rising these days, it’s tough to not turn on the air-conditioning or to take multiple showers in effort to cool down/stay cool. This, in return, isn’t friendly to the wallet and the environment and that is definitely a no-no.
So, today, we’re sharing our super easy and quick-to-do Refreshing Peppermint + Grapefruit Face Mist recipe so you can give yourself a nice cool down whenever you’d like!
Ingredients:
  1. Witch Hazel
  2. Distilled Water
  3. Peppermint Essential Oil
  4. Grapefruit Essential Oil
Other Tools Needed:
  1. Beaker
  2. Spoon
  3. 20ml spray bottle (you can find some in our store here)
IMG_20190324_162817_482

Instructions

1. Measure out 10ml of witch hazel and 10ml of distilled water. Pour both into your spray bottle.
2. Add in a drop of grapefruit essential oil and a drop of peppermint essential oil. Be careful not to add too much, especially if your essential oil is 100% pure!
3. Screw the top on and give it a good shake before spritzing away!

Notes:

*The lifespan of this mist is only 3 days as no preservative is used.
*The essential oil(s) used may eventually lose the potency of their scent and benefits due to oxidization.
happy crafting
Pssst, we're also available at Craftiviti.com!

Saturday, May 18, 2019

What are Natural Cosmetics?


In the world of personal care, it can be rather confusing trying to decipher what is natural and what is synthetic. This happens especially when you’re trying to find information about certain ingredients and end up with a bunch of conflicting results.
So, in the following video, Belinda Carli from Personal Care Formulations explores a couple of common production methods for natural and synthetic ingredients for personal care products. Among these ingredients are vegetable oils, extracts, and esters.

Thank you Belinda Carli from Personal Care Formulations for sharing this video with us!
happy crafting
Pssst, we're also available at Craftiviti.com!

Tuesday, January 29, 2019

DIY 3 Ingredients Facial Toner


Looking for the right facial toner for your skin isn’t as easy as it seems to be, especially when there’s an ocean of facial toners out there to try. We have to be certain that the ingredients in commercial facial toners are both compatible and kind to our skin (alcohol, parabens, and other harmful chemicals like salicylic acid are no-no’s!), and that there are benefits to reap (why spend on something that has no outcome, after all?).
Today, we offer an alternative to commercial facial toners that may be more cost-effective and better for your skin. Using only three key ingredients, you will end up with an amazing rose-scented toner that’s luxurious and incredibly beneficial for your skin!

Ingredients and their Benefits
– helps maintain the skin’s pH balance
– aids in controlling excess oil, and removing oil and dirt accumulated in clogged pores
– has anti-inflammatory, antibacterial and antioxidant properties
– helps hydrate, revitalise and moisturise the skin

– relieves inflammation and reduces skin irritation
– nourishes and moisturises skin
– can help tighten pores and reduce puffiness
– assists in speeding up the healing process of skin

3. Refined Glycerin USP 99.5% (click here to buy from our store!)
– moisturises, nourishes and smooths skin
– maintains water balance in skin
– assist in the healing process of skin while also protecting it
– also makes skin soft and supple

Recipe
*Please keep in mind that these are only suggested amounts for each recipe. It can differ for each person as everyone has their own personal preferences, and not all skin types are 100% the same as well.
Dry and/or Sensitive Skin
Rose water is perfect for dry and/or sensitive skin. So, there should be more rose water than witch hazel in this toner.
Our suggested amount:
  • 75% rose water of total amount of toner
  • 25% witch hazel of total amount of toner
  • ¼ teaspoon of Refined Glycerin USP 99.5% for each 225g of toner
Normal or Combination Skin
Our suggested amount:
  • 50% rose water of total amount of toner
  • 50% witch hazel of total amount of toner
  • ¼ teaspoon of Refined Glycerin USP 99.5% for each 225g of toner
Oily Skin
Witch hazel is perfect oily skins as it has astringent properties which makes it more drying compared to rose water. So, there should be more witch hazel than rose water in this toner.
Our suggested amount:
  • 25% rose water of total amount of toner
  • 75% witch hazel of total amount of toner
  • 1/8 teaspoon of Refined Glycerin USP 99.5% for each 225g of toner

Instructions
  1. Add witch hazel into desired container.
  2. Measure out the glycerine and add it in.
  3. Add rose water last.
  4. Cover tightly and shake to combine the mixture.
  5. Your toner is ready to use!

Email us if you have any enquiries at enquiry@craftiviti.com or pop by Craftiviti Craft Store at 10 Boulevard, Petaling Jaya, Malaysia.
If you found this post useful, please join us on Craftiviti Facebook or Instagram for more updates and demos!

References:
  1. “10 Rose Water Benefits: From Antioxidants To Anti-Aging”, NDTV Food, 2018 <https://food.ndtv.com/beauty/10-benefits-of-rose-water-you-need-to-know-1239785> [Accessed 30 January 2019].
  2. “18 Awesome Uses For Witch Hazel On Face, Skin | 8 DIY Recipes”, My Awesome Beauty<https://myawesomebeauty.com/witch-hazel-uses/> [Accessed 30 January 2019].
  3. “The Benefits Of Glycerin In Skincare | Paula’s Choice”, Paula’s Choice Skincare<https://www.paulaschoice.com/expert-advice/skincare-advice/best-products/benefits-glycerin-skincare.html> [Accessed 30 January 2019].
Pssst, we're also available at Craftiviti.com!

Wednesday, January 9, 2019

DIY: Lavender Rose Salt Scrub


One of the best ways to maintain gorgeous skin is manual exfoliation. Therefore, there are various scrubbing products available on the market, ranging from coffee scrubs to herbal scrubs and moisturizing scrubs. Nevertheless, salt scrubs and sugar scrubs remain the most popular choices. It should be noted that there are differences between a salt scrub and a sugar scrub, though.

*If you’d like to know about the differences and benefits of a salt scrub VS a sugar scrub, check out:
1. The Pros and Cons Of Salt vs Sugar Scrubs by Organic Elements Spa
2. Benefits of Sugar Scrubs VS Salt Scrubs by Suburban Simplicity

For this post, we will be sharing a simple DIY on how to make your own lavender rose salt scrub that can immediately be used for one time, and is free from additional ingredients like parabens and parfum. This scrub is meant to be used on the body since salt particles are more abrasive on the face. If you have sensitive skin or would like to make a face scrub instead, you can switch out the salt for sugar (such as our Natural Raw Sugar).
If you’d like, you can purchase these ingredients from our store:
  1. Pink Scrubbing Salt (you can mix some Epsom salt in as well, but using only Epsom salt might not give you all the benefits a salt scrub normally has. *If you’d like to know why, do check out this post by Tavoos!)
  2. Refined Coconut Oil (you can switch this with other carrier oils)
  3. Lavender Essential Oil
  4. Dried Rose Buds
Other Tools Needed:
  1. Measuring cup
  2. Spoon
  3. Container to put the finished product in (you can check out the types of packaging we sell here)
Instructions
1. Measure out 100 grams of pink scrubbing salt and add it to your container of choice. If your container is already meant to contain 100 grams, you can pour it directly into the container.
2. Depending on the kind of texture you prefer, add in 40-50 grams of coconut oil into the salt. Should it be too dry for your preference, you can add more coconut oil.
3. Add up to 4 drops (maximum per 100g, if you’re using Craftiviti’s essential oil) of lavender essential oil to the product.
4. Take the dried rose buds and pinch off the top (don’t break it off too close to the stem) before crushing and adding them to the product.
5. Mix the ingredients together and voila! Your lavender rose salt scrub is not ready to be used!
Notes:
*The lifespan of your scrub depends on the carrier oil you use.
*The dried rose buds (or any other dried flowers used) will change colour over time.
*The essential oil(s) used may eventually lose the potency of their scent and benefits due to oxidization.

Email us if you have any enquiries at enquiry@craftiviti.com or pop by Craftiviti Craft Store at 10 Boulevard, Petaling Jaya, Malaysia.
If you found this post useful, please join us on Craftiviti Facebook or Instagram for more updates and demos!
Pssst, we're also available at Craftiviti.com!

JOIN US ON FACEBOOK