Showing posts with label melt and pour soap. Show all posts

Saturday, October 26, 2019

DIY Melt and Pour Anti-Acne African Black Body Soap


Originated from West Africa, African Black Soap is traditionally hand-made using methods passed down through generations, using recipes that are centuries old. It’s a brilliant soap packed with antioxidants, vitamins A and E, fatty acids, and more, because of the plantain and palm leaves, banana bark, cocoa pods and shea butter. This makes it a ‘holy grail’ soap for us skincare enthusiasts!
So, what can African Black Soap do? It can…
  • balance skin moisture levels without making it oily
  • nourish skin
  • heal skin problems like acne, eczema, and psoriasis
  • fade skin discolorations and reduce hyperpigmentation
  • relieve dry and irritated skin
  • even skin texture and tone
  • deep cleanse for skin
  • natural exfoliation for skin
In fact, there’s a study by the Albert Einstein College of Medicine which found that over 90% of African black soap users who were a part of their study, reported to being satisfied with their improvement in acne, eczema, and general skin quality!
PS: It’s important to buy authentic, raw African Black Soap. There are “black soaps” in the market which contains artificial ingredients, thus they won’t give you the same results as authentic, raw African Black Soap.
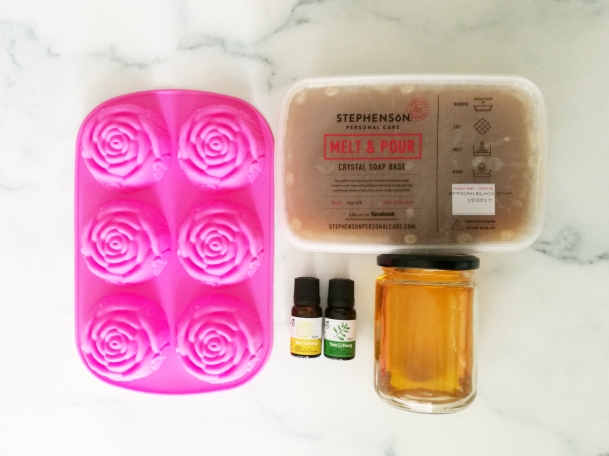
For this recipe today, we’ll be using Stephenson Personal Care’s Crystal African Black Soap (click here for more info!) base which is a completely natural Melt & Pour soap base “made using Raw African Black Soap from Ghana.”
bty
What You’ll Need:
  1. Stephenson Personal Care’s Crystal African Black Soap Base
  2. Calendula Infused Oil (made following this tutorial, or you can just get our 100% Calendula Oil if you prefer something quicker!)
  3. Tea Tree Essential Oil
  4. Lemon Essential Oil
  5. Silicone Mold 👉 We used this Large Rose Soap Mold here!
  6. Double Boiler
  7. Measuring Spoon
Instructions:
  1. Cut 500g of soap base and melt it in a double boiler.
    bty
  2. Turn off heat when melted and add up to 1ml of Calendula Oil, 10 drops of Tea Tree Essential Oil and 10 Drops of Lemon Essential Oil into the melted soap base. Stir well.
  3. Pour the melted soap base into a silicone mold.
  4. Set aside for 4-6 hours so that it can fully harden. You can use the soap immediately after!
bdr
Pssst! You can also use this soap just as it is!

happy crafting
buy it
Reference:
  1. Lin, A., Nabatian, A., & Halverstam, C. P. (2017). Discovering Black Soap: A Survey on the Attitudes and Practices of Black Soap Users. The Journal of clinical and aesthetic dermatology, 10(7), 18–22.

Thursday, August 29, 2019

DIY Chamomile and Green Tea Organic Melt and Pour Soap


Certified organic to the COSMOS standard, Stephenson personal Care’s Crystal OMP (Organic Melt and Pour) Soap Base is perfect for those looking for an option that has lesser chemicals. This melt & pour soap is vegetable-derived and contains no unapproved MPG or synthetic surfactants. It’s natural brown colour comes from the organic oils and sugar used in it’s formulation.

Picture by Stephenson Personal Care. To know more about this product, click here!

What You’ll Need
  1. Stephenson Personal Care’s Crystal OMP Soap Base
  2. 100% Calendula Oil (optional; any other carrier oil is fine too)
    Some Known Benefits 👉 has powerful antifungal, anti-inflammatory, and antibacterial properties; also helps promote healing and moisturizes skin while nourishing it
  3. Refined Glycerin USP 99.5%
    Some known benefits 👉 maintains water balance in skin; assists in the healing process of skin while also protecting it; makes skin soft and supple.
  4. Green Tea Powder
    Some known benefits 👉 a natural antiseptic; helps to restore the skin’s delicate pH balance; contains a powerful antioxidant called EGCG that reduces skin damage and signs of aging; helps maintain collagen levels for youthful skin structure and firmness
  5. 100% Pure Chamomile Essential Oil
    Some known benefits 👉 soothes irritated skin; brightens skin tone; refreshes skin and promotes skin health; relieves stress
  6. Silicone Mold 👉 We used this koi fish one which makes approx 40g of soap each!
  7. Double Boiler
  8. 1ml Measuring Spoon
stephenson personal care OMP soap craftiviti DIY melt and pour soap 1
Instructions
  1. Cut the soap base into small pieces and melt it in a double boiler.
    *Note: If you’re using the same mold as us, you’ll need 240g of soap base for 6 koi fishes.
  2. While the soap base is melting, create a slurry with 1ml of Refined Glycerin USP 99.5% and 1 ml of Green Tea Powder.
    stephenson personal care OMP soap craftiviti DIY melt and pour soap 2
  3. Turn off heat once the soap base has completely melted. Add up to 1ml of 100% Calendula Oil, 10 drops of Chamomile Essential Oil and the Green Tea+Glycerin Slurry from Step 2 into the melted soap base. Stir well.
  4. Pour the mixture into a silicone mold.
    *Note: You can use Isopropyl Alcohol in a spray bottle to pop surface bubbles in the melted soap base.
    stephenson personal care OMP soap craftiviti DIY melt and pour soap 4
  5. Set aside for 4-6 hours so that it can fully harden. You can use the soap immediately after!
stephenson personal care OMP soap craftiviti DIY melt and pour soap 3

happy crafting
Pssst, we're also available at Craftiviti.com!

Thursday, August 8, 2019

Why you shouldn’t add breast milk (or any fresh ingredient) to Melt and Pour Soap Bases


Hi Crafters!
There has been an increase in new mothers asking us if they can make breast milk soap with melt and pour soap bases, and this is a great concern because where is this misinformation coming from? We understand that every parent will want the best for their child (we would too, and for the parents as well!), but breast milk + melt and pour soap = a disaster waiting to happen.
You see, stainless_steel_soap_cutter_03any and all fresh ingredients shouldn’t be added into melt and pour soap because these ingredients will not become soap. It’s like adding melted chocolate to your perfectly-baked and smooth vanilla cake. You can either cover your cake with the chocolate, or inject it into the body of the cake, but at the end of the day, the chocolate and the cake are still separate from each other. They can’t seamlessly blend and become one  because the cake has already been made and baked before the chocolate was added.
So, in the case of melt and pour soap (henceforth known as MP Soap), the chemical process of saponification where the ingredients react with lye to become soap has already occurred.* It’s too late to incorporate fresh ingredients like milk, honey and purees as these fresh ingredients will not become soap.
*Note: To know more about saponification and how cold process soap is made, check out this informative blog post of ours! 
stainless_steel_soap_cutter_04If that doesn’t deter you from adding fresh ingredients into MP soap bases (because MP soaps are just so easy and convenient to make!), let us tell you this truth: it will go bad, and when it does, it will be harmful to you.
With the humid weather in Malaysia and even if you use preservatives, the MP soap will eventually turn rancid and foul. Putting your MP soap in the fridge may help a little, but like with every other foodstuff, it will go bad. Milk left in the fridge will become rancid past its expiry date, just like how leaving milk out on your table will cause it to turn bad too. The only difference is the amount of time it takes for it to go bad.
So, fellow crafters, if you prefer MP soaps that have fresh ingredients in them, please purchase those that have already been specially formulated and saponified with those fresh ingredients (like Stephenson Personal Care’s Soap Bases, or our Goat’s Milk MP Soap Base). Alternatively, do explore the wonders of cold process soap! They require more effort to make, but it’s definitely worth it because you can customize every single ingredient added into cold process soaps.

Thank you for reading! We hope this helps ❤
happy crafting
Pssst, we're also available at Craftiviti.com!

Thursday, June 13, 2019

DIY Gemstone Soap


Gemstone soaps are gorgeous. Not as entirely easy to make as your typical melt and pour soap (where you just melt and pour into molds, wait for them to harden and then, they’re ready to use), but definitely worth the extra effort!
The following videos are two tutorials on how you can make your own gemstone soap at home. We’ve tried both of them and found them easy to follow 😍
1. GEMSTONE SOAP D.I.Y. by mimi’z world 👇
2. How to Make Melt & Pour Gem Soap by Soap Queen/Bramble Berry 👇
The basics ingredients you’ll need:
  1. Crystal Glycerin Soap Base
  2. Soap Pigment (you can get them here)
  3. Stirrer
  4. Silicone Mold/Container
  5. Knife
  6. Essential Oils (you can get this here).
  7. Cosmetic Grade Mica (optional, you can get it here)
  8. Cosmetic Grade Glitter (optional, you can get it here)

happy crafting

Pssst, we're also available at Craftiviti.com!

Friday, May 31, 2019

DIY Soothing, Nourishing and Moisturizing Solid Shampoo Bar for Hair Growth


If there’s one thing that makes packing a chore, especially when you’re packing for a trip overseas, it’s packing liquids. From shampoo to conditioner, moisturizers to sunblock and lotions, perfume or cologne, and so on, so forth, we use a variety of products in liquid form on a daily basis. Skipping one or the other may help, but we’re also creatures of habit and deviating from what we’re already used to is something some of us can’t be bothered with.
With that said, shampoo bars are amazing products. They don’t take up as much space as liquid shampoo and you don’t have to worry about them possibly leaking or bursting out from their packaging due to pressure as well. Waste is also minimal when you’re using shampoo bars!
Before we start go ahead with the tutorial, let’s talk a little about Stephenson Personal Care’s Crystal Solid Shampoo Melt and Pour Soap Base, which you can buy from our store here.
Asian women bathing and she was bathing and washing hair.she is
According to Stephenson Personal Care, their Crystal Solid Shampoo is a…
Vegetable based melt and pour soap base, free from the surfactant Sodium Lauryl Sulfate. Made with Soothing Aloe Vera and containing Conditioning Additives this soap base is used for the manufacture of opaque Solid Shampoo bars.
This soap base provides excellent lather and also has brilliant moisturizing properties due to the high glycerin content. It’s neutral odor (though, not one some will like) also provides excellent fragrance lift.
For full details of their ingredients list and such, do check out their website over here!
Now, time to move on to the tutorial! Here’s what you need before you get to the DIY-ing:
bty
  1. Stephenson Personal Care’s Crystal Solid Shampoo Soap Base
  2. 100% Argan Oil
    Some known benefits 👉 makes hair softer, silkier and shinier. Can also help to treat split ends and tame frizzy hair.
  3. Peppermint Essential Oil 
    Some known benefits 👉 has antibacterial, antiviral, anti-inflammatory, insecticidal, antispasmodic and carminative properties. Also helps to increase circulation which can  improve hair growth and prevent some hair loss.
  4. Rosemary Essential Oil
    Some known benefits 👉 stimulates hair growth, slows down premature hair loss and graying of the hair.
  5. Silicone Mold 👉  We used this super cute rabbit one that makes perfect travel-sized bars!
  6. Soap Cutter 👉  We used this straight one with a wooden handle.
  7. Beaker
  8. Double Boiler
  9. Stirrer
  10. Oven Mitts or a Thick Cloth (to pick up the hot beaker)
  11. Measuring Spoon

Instructions

  1. Cut up 250g (although the mold we use can only hold up to 240g of product in total, we cut up an extra 10g in case of spillages and such) of Crystal Solid Shampoo soap base. The smaller the better as this will help speed up the melting process.
  2. Put the cut-up soap base into a beaker (or beakers) and then, place it in a double boiler. We recommend covering it so that the soap base doesn’t dry out faster.
    bdr
    Note: We strongly advise to use a double boiler/bain maire instead of the microwave. Although microwaving reduces the time taken for the soap base to melt, it increases the air bubbles in the base which can be difficult to completely removed and thus, compromises the stability of the soap.
  3. Once the soap base has completely melted, turn off the heat but don’t remove the melted soap base yet.
  4. Measure out 1ml of 100% Argan Oil, 10 drops of Rosemary Essential Oil and 10 Drops of Peppermint Essential Oil. Pour them into the melted soap base and stir well.
    btyNote: Our essential oils are 100% pure, so if you have sensitive skin, we recommend reducing the total amount of essential oil added.Also, make sure not to put too much oils, whether carrier oil or essential/fragrance oil or else you’ll end up with an oily bar of soap!
  5. Remove the melted soap base from the double boiler and pour it into the silicone mold. If you’re using our rabbit mold, make sure to pour all the way to the top so that the bunny will look complete!
  6. Set aside to harden.
  7. Once it has hardened, the solid shampoo bars are ready to be wrapped up (to prevent soap sweat; we normally use cling wrap) or used immediately.
bty

Note:

According to some articles, the harshness of a shampoo to your hair depends on it’s pH level. So the higher the pH level, the harsher it is. The best pH level for shampoo is between 5 and 7. For this soap we made, we tested it with litmus paper and we found it to be of pH7 (of course, this isn’t entirely accurate because the water used can affect this reading). Just to be safe, you can lower the pH level of the soap by adding in a little citric acid (not too much, though. Or else, the pH might be too low!)
happy crafting
Pssst, we're also available at Craftiviti.com!

Tuesday, January 1, 2019

Commercial Soaps VS Melt & Pour Soaps

There are various types of soaps available in the market, thus there are various ways to make them as well. As a result, not all soaps are made the same. So, it’s important to know which type of soap you’re buying and the ingredients contained in them.
For this post, we will be listing the differences between commercial soaps and melt & pour soaps.
Contents of Soap
Melt & Pour soaps have a higher glycerine content compared to commercial soaps. Therefore, melt & pour soaps are more beneficial for your skin since it is nourishing and moisturizing. It leaves your skin soft and supple while also protecting it. The glycerine is also what makes melt & pour soap easy to work with. Though, it can also cause the soap to sweat in humid climates (to prevent this, wrap your soap and keep them in a cool and dry place!). (1)
On the other hand, commercial soaps contain chemical detergents, synthetic and petroleum-based cleansers. They also have parabens—which are known as chemical preservatives; phthalates—which is a ‘plasticizer’ that increases the flexibility, transparency, durability and longevity of plastics; and synthetic perfumes. Many of these ingredients (and others) can be drying or irritating on the skin. Some of them can even cause health problems and skin conditions. (2)

Foaming Agents
Sulphates like SLS (Sodium Laureth Sulphate), which is the accepted contraction of SLES (Sodium Lauryl Ether Sulfate) are used as foaming agents in soaps. A great many of commercial soaps have SLS in them as it is an inexpensive and very effective foaming agent. (3)
Nevertheless, it should also be noted that some melt & pour soaps also contain SLS. For instance, both Crativiti’s melt & pour Goat’s Milk Soap Base and Shea Butter Soap Base contains SLS. Craftiviti’s Pure Soap Base, however, doesn’t contain SLS.

Customizability
Melt & pour soaps allows one to customize it according to their needs. You can choose the kinds of butters, carrier oils, fragrance oils, essential oils, clays, colourants, so on and so forth. Commercial soaps, on the other hand, are already ‘complete’ and may not meet all your needs.

Although commercial soaps are more affordable and require no (optional) extra effort before they can be used, they might not be the better choice for your skin and overall health. Switching to melt & pour soap can be more beneficial in the long run for you. Even so, you should ensure that you purchase melt & pour soap bases from reputable sources!

Email us if you have any enquiries at enquiry@craftiviti.com or pop by Craftiviti Craft Store at 10 Boulevard, Petaling Jaya, Malaysia.
If you found this post useful, please join us on Craftiviti Facebook or Instagram for more updates and demos!

References:
  1. “Free Beginner’s Guide To Soapmaking: Melt And Pour – Soap Queen”, Soap Queen, 2018 <https://www.soapqueen.com/bath-and-body-tutorials/melt-and-pour-soap/free-beginners-guide-to-soapmaking-melt-and-pour/> [Accessed 31 December 2018].
  2. “Natural Soap Vs. Commercial Soap | Pulp & Press”, Pulp & Press Juice Co., 2015 <https://www.pulpandpress.com/natural-soap-vs-commercial-soap/> [Accessed 31 December 2018].
  3. Kosswig, Kurt, “Surfactants”, Ullmann’s Encyclopedia Of Industrial Chemistry, 2000 <https://doi.org/10.1002/14356007.a25_747>.
Pssst, we're also available at Craftiviti.com!

JOIN US ON FACEBOOK