Showing posts with label DIY candle. Show all posts

Monday, July 22, 2019

9 Common Candle Making Mistakes and How to Avoid or Fix Them


A cheaper alternative to buying candles would be making them, and while it’s a fun craft where you’ll have complete control of how your candle looks and what would go in it, there are also risks and problems you can stumble into.
At Craftiviti, we often hear from our customers about the issues they face while making their own candles at home, and have come to notice that there are 9 common ones. So, for today’s blog post, we’ll be sharing with everyone our knowledge on these common candle making mistakes, why they happen and how they can be resolved ✨

1. When burnt, the candle emits smoke.
Among the possible causes for this would be:
a) a high fragrance/essential oil content
b) over-wicking a.k.a. the wick is too large for the candle
c) air pockets in the candle
How to avoid/fix them:
a) decreasing the amount of fragrance/essential oil content. For our waxes, we generally recommend adding no more than 10-12% of the total weigh of wax used per candle.
b) within a series of wicks, the larger the number the larger the wick. However, it should be noted that different waxes, fragrance/essential oils and even the colorants used can affect the burning of the candle.
c) you can warm up the container (for glasses and ceramics).
~ * ~
2. Cracks, holes and/or air pockets in the candle.
This is caused by the presence of water in your mould/container. Even the tiniest amount of moisture can cause a crack or hole to appear in your candle so it’s best to ensure that your mould/container is entirely dry before you pour in the wax.
Another possible cause is the temperature of the wax when you pour it into your mould/container. A lower than recommended temperature when pouring can cause air pockets in your candle. Thus, to avoid air pockets from forming, you can either warm up your container (for glass or ceramic ones only), or reheat your wax.
~ * ~
3. Candle doesn’t burn evenly.
This happens when the wax you use has a too-high melting point (or it’s just too hard) and/or the wick used is too small. You can easily solve this by blending or changing waxes, or using a bigger wick/multiple small wicks.
~ * ~
4. Colour change
Your candle having changed colours is a common occurrence. As wax cures over time, the colour of a candle can eventually darken over time. Or, if the colour changes as soon as the wax has cooled, then it’s probably because the wax was too hot when your poured it.
*Note: Always store your candles away from direct sunlight while they’re curing because they can affect the colour as well!
If you’ve multiple coloured waxes in a container, there’s a chance of the colours bleeding into each other as well. To avoid this, always allow the wax to harden entirely before pouring in more. Though, remember to pour the next layer at the correct temperature! Too hot and your previous layer might melt and cause the colors to bleed. Too cold and you might risk the presence of air pockets, cracks or holes!
~ * ~
5. I can’t smell anything from my soy candle when it burns.
Generally, soy wax has a good cold scent throw (a.k.a. it smells amazing when the wax isn’t hot) but very little hot throw. (a.k.a. you can’t smell anything when it’s hot/melting).  If you’d like for it to release a strong aroma when it burns, you can use a blend of waxes like beeswax and soy wax, or palm wax and soy wax.
~ * ~
6. The candle wick drowns out.
Usually happens when:
a) your wick is too small for your candle diameter
b) you’ve poured your candle above the point where your container changes shape (ie: the neck of the container)
c) you’ve cut your wick too close to the wax.
This can be fixed by:
a) switching to a larger wick
b) ensuring that the candle doesn’t reach the point where the container changes shape
c) by leaving at least 1cm of space between the tip of the wick and the wax.
~ * ~
7. I can’t demold my pillar candle!
A likely reason as to why this happens is that your wax is too hot when you’ve poured it into the mold. The best way to ensure that this doesn’t happen again is to wait a little after melting the wax before pouring it.
Though, if you’re stuck in this situation right now, try placing your the stuck candle in the refrigerator for a few moments. Once it’s cold enough, you can slide the candle out more easily.
~ * ~
8. The colorant is sitting at the bottom of the candle.
This happens especially when you’re using powder colourants like mica powders or cosmetic pigments. A way to decrease the occurrence of this is to give your melted wax a stir before every pour, or you can make a paste with your powder pigments with a tiny bit of carrier oil before mixing in with your wax.
~ * ~
9. My candle is too soft!
A likely reason as to why this happens is the presence of too much oil. Reduce the amount of fragrance/essential oil used and it should be fine.

We hope this post helps! ❤
happy crafting
Pssstwe're also available at Craftiviti.com!

Tuesday, May 28, 2019

DIY Sweet and Flowery Gel Wax Candle + Bloopers, Tips and Tricks!


Gel wax candles are gorgeous, especially if you’re looking to make candles that appear like water and have flowers suspended in them. However, gel wax is incredibly tricky to work with and we learned the hard way about some things you should and shouldn’t do when making gel wax candles.
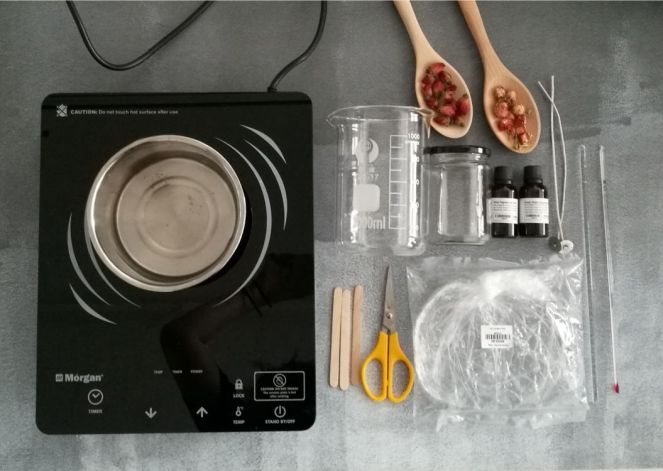
But before we share all the do’s and don’t’s, here’s what you need to make your very own dreamy, Sweet and Flowery Gel Wax Candle:
IMG_20190419_142431
  1. Clear Gel Wax ðŸ‘‰ We used this High Density Clear Gel Wax – 500g !
  2. Zinc Wick ðŸ‘‰ We used this Eco-6 Candle Wick – 8 Inches instead, BUT you might not want to as well, find out why at the [*Notes] section for Step 2 of Method 1.
  3. A Glass Jar ðŸ‘‰ We used this 350ml Clear Round Glass Jar with Black Cap.
  4. Honey Fragrance Oil
  5. Flower Water Fragrance Oil
  6. Dried Rose Bud ðŸ‘‰ We used this here.
  7. Dried Amaranth Globe Flower ðŸ‘‰ We used this here.
  8. Glass Thermometer – 200°C
  9. Glass Rod
  10. Scissors
  11. Popsicle sticks
  12. Elastic Band
  13. Double Boiler (for Method 1 only)
  14. Stove
  15. Heat Gun (for Method 2 only) ðŸ‘‰ We used a 2000w Ryobi Heat Gun
  16. Thick Cloth/Mittens (this is especially needed if you’re doing what we did at [Method 2].)
  17. Powder Free Latex Gloves (for those who hate washing their hands multiple times when handling gel wax)

Instructions

Method 1 – The Double Boiler (the BEST method)
1. Gel wax melts at 80+°C. For those who are impatient, make sure to break the gel wax into multiple smaller pieces to help speed up the melting process (do not stir while melting as this may introduce air bubbles into the gel wax!). The first time we did this, we broke them into three palm-sized pieces and that took more than an hour to melt.
IMG_20190419_145330
2. While the gel wax is melting, secure a wick to your container. We recommend not using super glue, glue dots or hot glue as they may melt and cause your wick to float when you’re pouring in the melted gel wax. Instead, you can secure your wick as shown below:
IMG_20190419_143432
*NOTES: Don’t use a wick that’s pre-coated with wax of any kind. A wax-covered wick will cause a cloud in the gel and it will not have a clear finish.
3. The gel wax is ready to be poured when it reaches around 94-104°C. Turn off the heat and add in your choice of fragrance oil. Here, we added 10 drops of flower water fragrance oil and 5 drops of honey fragrance oil for our 350g gel wax candle and the scent was strong.
*NOTES: 
a) The colour of your fragrance oil can affect the colour of the gel wax.
b) Adding fragrance oil to wax above the flashpoint will not cause it to combust.
4. Stir well but gently with the glass rod so that the fragrance oil is evenly dispersed in the melted gel wax.
bty5. Pour a little gel wax into the container, place some dried flowers on it, and pour another layer of gel wax. Do this until you’ve reached near the top of your container.
*NOTE: We don’t recommend pouring all the melted gel wax in first and then, pushing the dried flowers in to submerge them. This is because more fine bubbles will form and the flowers are more likely to float back up to the surface as well. (A picture showing the difference between layering and submerging the flowers can be found down below).
6. Snip your wick about 1cm taller than the gel wax. Then, let the candle cool and cure at one side for 1 to 2 days.
~*~
bty
On the left: Result of Method 1. We used a wax-coated wick which resulted in cloudiness, and we also pushed the flowers in to submerge them which resulted in lots of fine bubbles.
On the Right: Result of Method 2. We don’t recommend this method to those who are making candles to be used and not just for decorative purposes. Our wick burnt and there are a lot of huge bubbles, though they do provide a nice visual.
~*~
Method 2 – The Heat Gun (quicker but not the best way, lots of bloopers!)
1. Like in Method 1, break the gel wax into small pieces. Make sure your wick is secured to your jar before filling the bottom of the container like so:
bty
*NOTE: Make sure your jar can withstand high temperatures for this method!!
2. Melt the first layer of gel wax using a heat gun. Ours is of industrial strength and this was not a good thing because our wax-covered wick ended up burning. We’re not sure if a weaker heat gun would result in the same thing, though.
bty
3. Add a drop of honey fragrance oil and flower water fragrance oil into the melted layer of gel wax. Gently stir to evenly distribute the fragrance oils.
4. Place some dried flowers on the melted layer of gel wax before placing a layer of un-melted gel wax on top of them. Ensure that the un-melted gel wax completely covers the dried flowers in order to avoid burning or darkening.
bty
5. Repeat steps 3 and 4 until you’ve reached near the top of the jar.
6. Let the (non-)candle cool and cure at one side for 1 to 2 days.
*NOTE: We tried to pierce through the gel wax to insert a wick before we did step 6 but it just didn’t work out well.

This tutorial is honestly a mess but we couldn’t not share what we’ve learnt through our trials and errors with you. We’ll do an upgraded tutorial on the Sweet and Flowery Gel Wax Candle using Method 1 only, so please keep an eye out for that! ❤
happy crafting
Pssstwe're also available at Craftiviti.com!

Wednesday, February 13, 2019

How to Use Our Premium Massage Candle Base

Making a massage candle has never been easier than simply purchasing your choice of essential oils and Craftiviti’s Premium Massage Candle Base! Not only is switching to this product kinder to your wallet, but the days where you have to make your own massage candles from scratch will be gone.
But, before we get into the tutorial on how to use it, here’s some information on this awesome product:
Our Premium Massage Candle Base is different from traditional wax candles and other natural candles. Instead of wax, this candle base which is specially formulated so that it can be used on the body, melts into oil at a safe and sensual 40°C (no need to worry about getting burns or waxy after a massage!).
This product is made from:
Cocoa Butter, Jojoba Oil, Shea Butter, Grape Seed Oil, Sweet Almond Oil, Soybean Oil, Wheat Germ Oil, and Borage Oil, Ascorbyl Palmitate (a fat-soluble form of vitamin C), and Tocopheryl Acetate (a form of vitamin E).
*To know more about the carrier oils and butters mentioned, check out AromaWeb which has informative profiles for them and more!
As a result, it’s ultra nourishing and moisturizing for the skin!

So, what do you need before making your massage candle using our product?
  1. Premium Massage Candle Base (click here to buy)
  2. A container for the candle (you can check out our store for these)
  3. Suitable wicks (we have a bunch you can choose from)
  4. Glue dots (you can get them here. They’re optional, but super helpful for securing wicks!)
  5. Essential Oils of your choice! (we have a selection that you can choose from here)
How to Use:
  1. Melt desired amount of Premium Massage Candle Base over a double boiler. Stir so that it’s evenly melted.
  2. Remove from heat and add in your desired essential oils. Stir again so the oils are evenly distributed.
  3. Pour mixture into a container that already has a fixed standing wick.
  4. Allow mixture to cool down and solidify.
  5. Once solid, the massage candle is ready to be used!

Email us if you have any enquiries at enquiry@craftiviti.com or pop by Craftiviti Craft Store at 10 Boulevard, Petaling Jaya, Malaysia.
If you found this post useful, please join us on Craftiviti Facebook or Instagram for more updates and demos!
Pssstwe're also available at Craftiviti.com!
Wednesday, November 28, 2018

Candle Making – Soy Wax VS Palm Wax


Wax is an essential component in the making of candles. Thus, there’s a variety of waxes one can choose from. Among them are soy wax and palm wax—both of which are different, though they share some similarities as well.
In this post, we will be highlighting the differences and similarities between these two waxes:

Palm Wax…
1. Derives from palm berries.
2. It’s a type of hard wax, which makes it perfect for pillar, votive and layered candles.
3. Produces a crystalline/feathered/iced effect in candles.
4. Has a very high melting point.
5. Absorbs a greater level of fragrance.
6. Can be blended with soy wax to make it harder while still retaining the natural qualities of the wax.

*To purchase palm wax from Craftiviti, simply click here!


Soy Wax…
1. Is made from soybean oil.
2. Does not produce soot and leaves no black ring around its container.
3. Has a lower melting point compared to palm wax.
4. Provides excellent scent throw and minimal frosting.
5. Produces smooth and creamy candles.
6. Can also be used to make balms, butters, etc..

*To purchase palm wax from Craftiviti, simply click here!


Both palm wax and soy wax are natural materials. They’re both ideal for candle making as well. It’s only a matter of personal preference to which you’d prefer when making candles.


Pssstwe're also available at Craftiviti.com!

Wednesday, June 27, 2018

Make Crystal Candles with a Frosty Look

Every once in awhile we find a product that deserves a lot of attention just because it is so beautiful to look at.
Craftiviti Ice Wax definitely deserves the spotlight in on our blog this month.
Made from a special blend of 100 % from Palm Oil base (Vegetable Origin), the Ice Wax cools with a look that is so unique it almost glitters!
Ice Wax picks up colors wonderfully and creates a random beautiful surface that is absolutely mesmerizing.
The crystal patterns are smooth so it’s perfect for pillar candles where you get to show off every part of this crystallized look.
But the Ice Wax is not only just all about looks, it also burns well and retains scent very well too.
Also, it has a very low melting point of 50-60 deg Celsius so it really reduces the time it takes to make your candles.
Recommended fragrance load is 3% to 5% but of course you can test it out for yourself to find a formulation that suits you.
Instructions
  1. Secure wick to pillar mold
  2. Melt Ice Wax over double boiler
  3. Add in fragrance 3% - 5% of weight of wax
  4. Add in 0.5% candle dye
  5. Stir well and gently pour into pillar mold
  6. Let cool 48 hours before removing from mold

More information here>> https://www.craftiviti.com/product/ice-wax/

Thursday, February 22, 2018

How to Make Soywax Candles

Making your own soywax candle is a pretty easy project to do but there are tricks to it. 
First, start off with a good bag of soywax. Some soywax comes in flakes. Ours comes in off white buttery pellets. Temperature, scent throw, burning time and hardness all depends on the type of wax you pick, so pick well and start with small batches. 

Here are some of the basic things you'll need to get started. A candle jar, wick with metal base (sustainer) and some fragrance oil blends. Here we use Eco-wick 14. 

Eco-wicks are ideal because they were designed specifically for soywax. They burn well, create less soot and carbon deposits. They burn with a controlled consistent flame and also works well with other natural waxes to ensure an even burn. Eco-wicks are made from natural flat cotton threads interwoven with paper threads that produce a rigid structure for easy pouring. It does not contain lead or zinc. 

The size of the wick depends on the size of the candle diameter. Make sure you pick a good sized wick. Eco-2 are for smaller candle diameters and the larger wick sizes suit wider diameters. Trial and error is how you pick the right wick.
Glue the base of the wick to the middle of the jar. Make sure you only use glass jars. Plastic jars are a huge no-no since they will melt and produce toxic fumes. Centering the wick is also very important because an off-center wick will create an uneven burn.

Here we use transparent glue dots to glue the wick down. This means you can reuse the jar again once the candle is all used up, just peel the glue dot off and reuse the jar. For a more permanent attachment, we like using the E6000 adhesive glue. It holds well and is a clear strong glue that does not show at the bottom of the jar.
To centralize the wick so that it stays upright, we tie the end of the wick to a stick (chopstick here) It can be a little tricky to do as the wick base will tend to dis-attach from the base.

The easier way is to use a bow tie clip, as seen below. This tool helps you slot in the wick easily and the sides are designed to rest well on at least 4 different candle jar diameters.

Melt the soywax in the microwave. To be honest this is the lazy crafter's way of melting wax. the better way is to slowly melt soywax in a double boiler. This way you can control the heat of the wax.

 So only use a microwave if you know exactly how your microwave settings work. We don't want to over boil the wax. 

Here we zap the soywax a few times under low temperature in short 1 minute bursts. 
The melted soywax looks like any other regular oil. The heat can be quite high so this is where you will need to be careful and keep any running kids and pets away from the kitchen.

The common question we get asked is much soywax do you melt ? As a general rule of thumb, if your jar is 100ml, melt 100g to 120g of soywax. Don't worry, if you melt more, you can always keep the extra wax and remelt for the next time.

Once the temperature gets down to to 40 degrees Celsius, add in your essential oil or fragrance oils. We use 8% oil to the weight of the wax. Scents are tricky for soywax. Some fragrances are strong and lingering. Others are weak and fleeting. It is best to do a small batch test before confirming the scented oils you need to make a larger batch. Always remember, soywax can be very picky with its fragrances.

It is known that essential oils won't leave a lasting scent so many crafters blend their essential oils (natural) with fragrance oils (synthetic). The first is to have a therapeutic claim on their candle (lavender aka calming / lemon aka uplifting) and the later oil to create a stronger more lasting scent. 
After adding and stirring the essential oil in, gently and carefully pour the hot wax into the jar. Be careful not to move the wick and even if you do, just reposition the wick after pouring to make sure the wick is always in the center of the jar.

By this time, the wax temperature would have dropped below 40 Celsius. The reason why we would recommend you add your scented oil under 40 Celsius is because scented oils in wax that is too hot will tend to evaporate fast. So keep the temp low when adding your essential or fragrance oils. 
Now all you do is wait. Don't move your jar anywhere as it may cause unclean edges or uneven surfaces. Just let the wax cool.
Here you will see the wax start to cool. 
Once cooled, do not be amazed if you see the wax surface looking like the photo above. It's quite normal for soywax. To avoid this uneven surface, you can add a wax blend of paraffin or beeswax. However, if you want your candle to be 100% soywax, you can add up to10% soywax additive that will help stabilize the wax.

Soywax additive is a great addition to soy wax candles because they add firmness to the candle, imparts a smoother pour and eliminates the trouble of a surface top-up or post pour maintenance.

Candle additive also helps the candle burn longer and improve the scent throw and fragrance retention. Also, because the price of additive is slightly cheaper than pure soywax, adding up to 10% wax additive can help reduce the overall price of your soywax candles.
Since we did not use any additive in this candle above, we needed to do a second top up pour. Now the surface is even and smoother. And here is where you trim the wick and admire the fact that you just made your own handpoured soywax candle.
DO NOT burn the candle immediately. Wait for at least 7 days before using the candle. This waiting time will help infuse the oils, harden the wax and improve the fragrance especially if you are using a blend of oils. 

To maintain your handmade soy candle, burn the candle for no longer than 2 hours each time. Before relighting the candle, always trim the top part of the wick. Wick trimming is hard with scissors especially when the wax starts receding and the wick gets shorter. Here is where you can trim with a wick trimmer

When you take care of your handmade soy candle, the flame will burn well and this homemade soywax candle can last many many rounds of burning. 

Remember, never ever leave a burning candle unattended, even if it is in a glass jar.

More craft materials available online and at our craft supplier at Craftiviti Sdn. Bhd. (Petaling Jaya, Malaysia).


JOIN US ON FACEBOOK