Saturday, June 20, 2015

LIQUID SOAP BASE - MAKE YOUR OWN GENTLE SKIN WASH

Craftiviti Liquid Soap Base is a very concentrated form of liquid soap. This soap is the foundation of soap and therefore it contains no coloring, perfume, preservatives, c and most importantly, no harmlful chemicals. 

This soap base is so pure, it is like a clean slate for soap making. So it is totally left up to you to add anything you want to it.

And this is where the creativity begins...
All you need are 4 basic ingredients:
1) 50ml Water 
2) 15g Craftiviti Liquid Soap Base (30% weight of water) - you can get it here
3) 3 to 4 drops essential oil blend - you can get them here
4) 1 tablespoon carrier oil - you can get them here
*Makes 70ml of liquid soap

Mixing Method
It's easy. Just mix it all together. Give it a good shake and pour it into a liquid or foam dispenser.
DONE!

Here we used Virgin Coconut Oil for our carrier oil to give our soap a wonderful scent and also to give the liquid a richer bubbly effect. We also used a blend of pure Rosemary and Orange Essential Oils to give it a wonderful citrus herbal scent.

NOTE: Because this base is so pure and contains no preservatives and additives, any addition such as water, carrier oils, dyes or scrubs to the base will affect its shelf life.

So to keep the batch fresh, only take out what you need and keep the rest in the fridge.

Adding essential oils such as Rosemary, Tea Tree or Eucalyptus will also help naturally preserve the soap base due to the oils' antimicrobial properties. 

About Craftiviti Liquid Soap Base

This unique soap base is made up of coconut oil, olive oil, starch from potato and corn, and wheat protein.

It contains no Sulfate (SLS / SLES) which can irritate people suffering from sensitive or dry skin. It also contains no harmful chemicals, parabens or additives, and no alcohol. 

Liquid Soap Base is a gentle cleanser for those suffering from eczema, skin rashes, acne and more. Ideal as a base for medical soap. Contains no animal origin. 

Click here for more info

If you found this post useful, please join us on Facebook for more updates and demos!


HOW TO MAKE YOUR OWN MOLD WITH MOLDMAKER RTV SILICONE RUBBER

Mold making is so easy. Imagine making molds for your craft and casting loads of duplicates forever and ever.

You can make clay molds, soap molds, candle molds, epoxy resin molds, gem molds, figurines, miniature parts, and much much more. 

Here, we are going to walk you through how we made a mold out of Craftiviti Moldmaker RTV Silicone Rubber. 

We have this mold jewelry mold that was so used and torn (it broke a few months after this project by the way) and we wanted to duplicate this mold. 

In short, we decided to make a mold OF a mold. 
Here's what the old mold looks like. It's for casting clays and epoxy jewelry pieces. From the pic above you can see how deformed the mold is. We needed a NEW mold. 
First we made a border for the mold out of Monster Clay. We used Monster Clay because it contains no sulphur and is easy to work with AND it can be reused indefinitely. 
When making molds with RTV Silicone Rubber, never use any ingredients that contains sulphur. If you do, the rubber will not set.
Craftiviti Moldmaker RTV Silicon Rubber. Here's what the set looks like. 
It comes with 1kg Silicone Rubber and 50ml hardener.
Mixing Ratio: 3% hardener (that's the green stuff) to the weight of the silicone rubber. 
So if you have 100g of  Moldmaker RTV Silicone Rubber, you only need approximately 3g hardener. A dripper or pipette is the best measuring tool for this and a very sensitive weighing scale too. Once you get more familiar our Moldmaker RTV Silicone Rubber, you can roughly gauge 3g as 3ml. 
4% gets the rubber to set very fast. You can give 4% a try if you want a shorter working time. 
Give the mixture a good stir. Try not too incorporate too much bubbles into this mix. Stirring in a figure 8 always helps. Once the two colours are completely mixed, you will get a uniform pastel green liquid rubber mix. Work quickly as the rubber will start to cure. The open time is around 3 minutes. 
Slowly pour the mixture into the prepared mold. To avoid the poured silicone rubber from sticking to the original piece, spray a thin layer of silicone release on the surface of the original piece. 
Let the liquid rubber set for 1 hour.
Demolding time is the fun part. Just remove the Monster Clay border and slowly peel the silicone rubber away from the original piece. See how wonderful the  Moldmaker RTV Silicone Rubber duplicates the details?
Let's call this new piece a MASTER. 
Remember, these steps are for creating a mold from an original mold. However, if you just need to make a mold out of something you already have like a pendant or a carton figurine, simple use the item as your MASTER and pour silicone over it. 
Now we need to make a mold out of this MASTER. Place the MASTER into a box/container or you can build another clay wall around it. Here we used a simple food container just because the size was right. 
For bigger pieces or odd sizes, you can make a box out of acrylic sheets.
Next, repeat the same steps of mixing hardener with Moldmaker RTV Silicone Rubber. 
Slowly pour the liquid rubber over the master. Start at the edge and allow the liquid rubber to flow in a thin stream over your MASTER. Do this very slowly. This reduces bubbles from being trapped during the process. 
To help release more bubbles, just give the box a gentle tap.
Once the mold hardens (this took 3 hours) we just pulled the entire chunk out of the food container.
To get to the final mold, we needed to slice the rubber along the edges until we could see the joining of the two pieces. We used a normal blade for this. 
Once you see the joining, simply pry it apart. The Moldmaker RTV Silicone Rubber is extremely durable, as long as the rubber is thick enough, you do not have to worry about any tears 
Once the pieces have been separated, continue trimming the mold until you are happy with the size or shape of it. 
And here we have it. The original, the master and the MOLD. 
This new mold can be used many times over. That's the beauty of Moldmaker RTV Silicone Rubber from Craftiviti. It is ultra-durable and very flexible. Great for casting small parts, fine details and items with multiple dimensions. 
 It's that simple!

Email us if you have any enquiries at enquiry@craftiviti.com or pop by our store at 10 Boulevard and meet with us :)

If you found this post useful, please join us on Facebook for more updates and demos!

Saturday, June 6, 2015

MAKING SOAP WITH CLAY

Natural clays have a wonderful effect on the skin. After a hard day at work, nothing beats coming home, smacking on some soothing mud mask and hibernating on the couch with a glass of wine.

There are many types of clays that are popular in skincare products. Here's a short list:
- Fuller's Earth
- Bentonite
- White Clay
- Kaolin Clay
- French Green Clay or Pink Clay or Yellow Clay

Each clay has their own composition of minerals and benefits but essentially all clays help deep cleanse the skin, draw out impurities and tighten the surface.

How to use clay

There are many ways you can use clay with your skincare.

1) Mix raw clay powder with some purified water and slap it on your skin. Add a few drops of essential oils and some jojoba oil or rosehip oil for more therapeutic benefits.

2) OR you could do what we did and add it to Craftiviti's Melt & Pour soap base for an instant homemade clay soap that helps detox and cleanse skin.

The process is really easy and we'll walk you through it with some photos we took.

Here's everything you need for some homemade soap.

1) Melt & Pour Soap Base
You will need a good block of Melt&Pour Soap base. Make sure you know the ingredients for this product as some tend to contain alcohol and other addictives. Here we used an SLS free soap base made from Virgin Coconut Oil and Unrefined Palm Oil. That's why the colour you see is slightly opaque and yellowish. You can get the same soap base here

2) Pure Essential Oil
Pick some essential oils that you like. Here we used RAW Lemon, Peppermint and Grapefruit Essential Oil by Craftiviti. We decided to make two kinds of soaps here. Follow on and you'll see.

3) Soap Mold
You will need a mold that will make a good hand-size soap and is easy to demold. You can buy them here

4) Clay
And finally, your clay. Here we used Organic French Green Clay from Greece.

Here's what the Organic French Green Clay looks like up close
Step 1
Place soap base in a microwave safe glass bowl and heat that up at low temperature. Check the soap from time to time and give it a good stir. Do not overheat soap.
Step 2
Once the soap has melted, mix the clay with some water to form a wet paste. The amount to use depends on how much soap you plan to make. Here we used one teaspoon of clay to make one hand-size soap. You can sieve the clay before adding water to remove larger particles.
Step 3
Add some essential oil to the melted soap base. Here we used Peppermint Essential Oil from Craftiviti which went really well with the French Green Clay. Then mix the clay into the soap base. Stir gently.
Step 4
Pour the entire mixture into the mold. As you can see from the photo above there will be bubbles on the surface of the mold. Two things you can do to get rid of the bubbles. One, spray some isopropyl alcohol onto the surface and watch the bubbles POP. Two, just shave the surface off when the soap hardens. 
While we wait for the clay soap to set, we made another soap out of Grapefruit and Lemon Essential Oil. Just melt the soap base and drip the essential oils in. Here we used 5 drops each. You can also add a few drops of carrier oil such as Jojoba or Avocado Oil for more moisturizing effect.

And here we have two very different soaps that's great for the skin without the chemicals and artificial fragrances. 

Prep time: 10 minutes
Setting time: 30 minutes

Friday, April 3, 2015

Liquid Hand Soap - Step by Step How To Guide

Liquid hand soaps are such a charm to use.

Craftiviti Liquid Hand Soap is the very basic of all liquid soaps. There is no coloring, no perfume, no preservatives, no chemicals. It is so pure, it's like a clean slate for soap making. So it is totally left up to you to add anything you want to it.

And this is where the creativity begins...
All you need are 4 basic ingredients:
1) 50ml Water 50ml
2) 15g Craftiviti Liquid Soap Base (30% weight of water)
3) 3 to 4 drops essential oil blend
4) 1 tablespoon carrier oil
*Makes 70ml of liquid soap

Mixing Method
It's easy. Just mix it all together. Give it a good shake and pour it into a liquid dispenser.
DONE!

Here we used Virgin Coconut Oil for our carrier oil for that wonderful scent and also to give the liquid a richer bubbly effect. We also used a blend of pure Rosemary and Orange Essential Oils to give it a wonderful citrusie herbal scent.

Because this base is so pure and contains no preservatives and additives, any addition such as water, carrier oils, dyes or scrubs to the base will affect its shelf life.

So to keep the batch fresh, only take out what you need and keep the rest in the fridge.

Adding essential oils such as Rosemary, Tea Tree or Eucalyptus will also help naturally preserve the soap base due to the oils' antimicrobial properties. 

About Craftiviti Liquid Soap Base

This unique soap base is made up of Palm Oil, Coconut Oil and Olive Oil. 

It contains no Sulfate (SLS / SLES) which can be irritate people suffering from sensitive or dry skin. It also contains no harmful chemicals, parabens or additives, and no alcohol. 

Liquid Soap Base is a gentle cleanser for those suffering from eczema, skin rashes, acne and more. Ideal as a base for medical soap. Contains no animal origin. 


Wednesday, March 4, 2015

WOOD BURNING TOOL - PYROGRAPHY

Wood burning, also called pyrography, is the process of drawing a picture on a piece of wood with a hot brass tip. 

Wood Burning Basics

  • Sand your wood before starting the project. Wipe the surface with damp cloth once done sanding.
  • Do not do wood burning project on a varnished wood as the varnish with affect the burning process.
  • Trace your design with a pencil before starting.
  • Handle your woodburning pen with care. Pen will get hot quite fast, so attach the tip before turning on the machine. Give the pen two or so minutes to get hot. As it heats up, let your wood burning pen rest in a pen holder device to minimize the risk of accidental burning.
  • MDF
  • Pine
  • Basswood
  • Birch
  • Ash
  • Maple

At Craftiviti we have Livingart Wood Burning set which consists of 7 interchangeable brass tips with a holder suitable for pyrography, soldering, leather craft and stencilling. This light weight handtool includes a 40-watt with fast heating that develop maximum temperature 320 degrees C.
Included Brass Tips:
  • Universal Point
  • Shading point
  • Flow point
  • Cone point
  • Fine point
  • Dot point

Visit our website:
www.craftiviti.com

For wood burning, try using these types of wood for starters:
It is best to practice and experiment on a smaller wood surface to get a better feel on how to use your tools. And now on to the tools...


Here are some stunning pyrography pieces:

More wood burning Technics and tricks that you can refer to here

For further enquiries on pyrography tools, write to us at enquiry@craftiviti.com
Or visit our outlet to have a look or purchase online here.

Saturday, February 14, 2015

SCULPTING WITH SULFUR-FREE MONSTER CLAY®

Monster Clay® Premium Grade Modeling Clay is a re-useable sulfur free, professional oil/wax based sculpting medium. 


Composed entirely of non-toxic, food grade components, Monster Clay® has an ultra smooth formulation that features a low melt temperature and low tack feel that will not stick to tools or fingers. 

Monster Clay has high plasticity and has a unique elastic quality much like soft taffy when warm. 

Right out of the tub, Monster clay has a waxy firm texture great for carving. At average room temperature, Monster Clay is firm enough to capture even the finest details. 


However, some sculptors like heating up the clay a little more for a softer more pliable texture. 


Just roll a ball of the clay in your hand and you will notice the clay soften just from body heat making this clay extremely versatile for all types of work. 


But that's not all...


Monster Clay can easily be turned into liquid pourable clay. Just pop it into the microwave along with the container it comes in. This makes Monster Clay great for casting and for making copies of life casts where changes are needed. 


Monster Clay sulfur-free recipe is compatible with platinum silicone molding compounds (silicone rubber).

Another thing that is great about this clay is that it can be remelted and reused indefinitely which makes it great for cost effective projects and sculptures. Those learning to sculpt will also find this clay wonderful to work with. 

Enjoy this short video from Academy Award Winner, Rick Baker sculpting using Monster Clay.

Learn more about Monster Clay here.

Monster Clay is available in 5lb (2.28kg) block at Craftiviti retail craft store or you can buy online here.


Thursday, January 29, 2015

HOW TO SOFTEN POLYMER CLAY

For those working on polymer clay, you'll find something in common. Polymer clay tends to harden over time. 


While polymer clay is an oven bake clay and not an air-dry clay, over time, it will harden. This happens when the plasticizer evaporates. But this is not the end for your clay. 

There are ways to slow this hardening process. 

Always keep your clay in an air-tight container away from heat. For extra protection, keep it in a zip lock bag first. 

But in case you already have a chunk of clay that is too hard to work on, don't give up on it just yet. 

Sculpey Clay Softener is a great product to help recondition your old, hardened or dried up clay. It can be used with SCULPEY, PREMO or FIMO clays. 

Just chop the clay up into small bits, place it all in a zip lock bag, add a few drops of the softener and shake it all up. After leaving it in the bag for a few days, work on the clay with a roller until all the bits are well mixed together. We find using a clay roller helps to recondition the clay even faster. 


Here's a video on how to use this product. 


For further enquiries, write to us at enquiry@craftiviti.com
Or visit our outlets to have a look. 


Visit our website:
www.craftiviti.com


Wednesday, November 19, 2014

CRAFTING WITH EPOXY RESIN

We have received may enquiries about resin so we've done up this post. Hope it helps. 

Resins are fascinating materials so we are glad you asked. They can be used to cast figurines or objects, as a coating for craft pieces, to encase images or items such as flowers or tiny intricate objects, or to mend broken objects. 

At Craftiviti, we have two types of resins: Epoxy Resins and Polyester Resins.

Polyester Resin
Polyester resin is slightly opaque and does not have the clarity of Epoxy Resin. Polyester is also quite toxic in nature so a well ventilated working area and a good mask is advisable when working with this material. Polyester Resin can be used to cast larger objects and is much cheaper to work with compared to Epoxy Resin. It is sold with a hardener which helps the resin cure and harden. Unlike Epoxy, polyester resins only need a few drops of the hardener to work it's magic. 

Epoxy Resin
Many crafters love to work with epoxy resins simply for its crystal clear effect. Unlike polyester resin, epoxy resin is non-toxic and does not give off poisonous fumes. The cured resin is very hard, durable and safe to use. It is perfect for embedding flowers, photographs and just about anything else. Epoxy resin also needs a hardener or catalyst to cure. The ratio of resin to hardener depends on the product instructions. For our epoxy resin, a ratio of 2 parts resin to 1 part hardener is required.\

People who enjoy making miniatures sometimes use resin to simulate water when creating beach and ocean scenes. Smaller amounts of resin can be used to design replicas of soups, liquid drinks, and fishbowls. Jewelry makers use epoxy resin to create necklaces, pins, bangles, bracelets, earrings, and rings that feature embedded glitter for a fun effect.


When compared to other traditional thermoset or thermoplastic resins, epoxy resins have distinct advantages, including:


  • Low shrink during cure
  • Excellent moisture resistance
  • Excellent chemical resistance
  • Good electrical properties
  • Increased mechanical and fatigue strength
  • Impact resistant
  • No VOCs
  • Long shelf life
Types of Epoxy Resin available
1) Clear Epoxy Resin - Clear flat casting
2) Soft Epoxy Resin - Flexible coating for stickers or flat surfaces
3) Doming Epoxy Resin - Hardens with a slight dome like a water droplet


Materials needed while working with Epoxy Resin
- Disposable measuring cups
- Digital scale
- Disposable stirring sticks
- Items for embedding
- Silicone Release Agent
- Mold


Instructions

1) Epoxy resin can be measured by weight or volume. Before measuring, give the resin a stir and the hardener a good shake.

2) The ratio of 2 parts resin to 1 part hardener must be followed to other wise, curing will not happen. For example: 200g Epoxy Resin, you will need 100g hardener. Or 1 cup resin, half cup hardener. 

3) While pouring the resin into the measuring cups, do so slowly so as to avoid bubbles. Tap the cups to release the bubbles to the surface. 

4) Pour the hardener slowly in to the resin and mix well. Curing will not happen is the mixture is not well mixed. 

5) Spray a layer of silicone release agent such as Weins Silicon Release Agent into the mold. This helps demold the cast once the resin is cured. 

6) Slowly pour resin into mold or onto objects you would like to embed. Tap mold on the sides to release bubbles. You can also scope the surface bubbles out or prick them with a needle. You can also spray a thin layer of rubbing alcohol on the resin surface to help disperse the bubbles.

7) Resin will take 2 to 4 hours to fully cure depending on the thickness and size of the casting.


Epoxy Resin storage life
When kept separate from hardener, epoxy resin has a long shelf life. Store both resin and hardener in a cool, dry area. And always make sure the can is tightly shut. 

Cleaning up Epoxy Resin
For spillage or to clean up utensils, use Acetone, rubbing alcohol or any nail polish remover. 


Molds for Epoxy Resin
Silicone or latex molds are best for Epoxy Resins as the resin will not stick to the mold and demolding is easy. 

You can make your own silicone molds with our RTV Silicone Rubber or with Smooth-On mold making materials. 

For other molds such as plastic molds or trays, first spray on a layer of Silicone Release Agent to avoid sticking.  


Embedding paper or images
If you would like to embed photographs or paper designs, it is best to seal your paper first. We recommend using Supergloss or White Modelling Glue. Coat the paper or photograph on the top, bottom and even on the sides to seal it. This will prevent the resin was seeping into the paper and turning it translucent. 


Pigments and Dyes
To tint the resin, you can use Mica's and resin pigments and dyes which we carry in store.
Visit us at Craftiviti retail craft store or you can buy online here.

Tuesday, October 28, 2014

LUMI INKODYE FABRIC PRINTING KITS

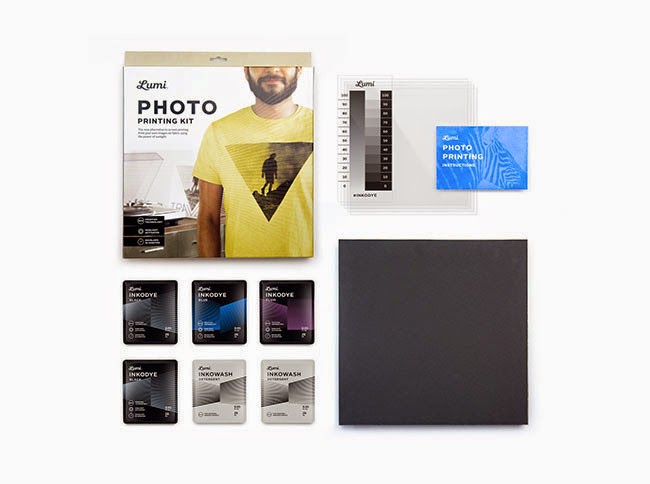
LUMI PHOTO PRINTING KIT

The easiest to get started with Inkodye.
Print your own images on fabric using the power of sunligh. 

Comes with:
4 x Inkodye 0.05oz Snap Packs
(2 x Black, 1 x Blue, 1 x Plum)
2 x Inkowash packets
4 x Inkofilm 8.5" inkjet-printable film
Printed instructions
Project board (12 x 12")
Test negative
RM180


LUMI SHADOW PRINTING KIT

Printable canvas pouch (8x4")
Inkodye Orange 0.95oz Snap Pack
Inkodye Magenta 0.95oz Snap Pack
Inkowash packet
Printed instructions
Acrylic overlay
RM129


JOIN US ON FACEBOOK