

Gel wax candles are gorgeous, especially if you’re looking to make candles that appear like water and have flowers suspended in them. However, gel wax is incredibly tricky to work with and we learned the hard way about some things you should and shouldn’t do when making gel wax candles.
But before we share all the do’s and don’t’s, here’s what you need to make your very own dreamy, Sweet and Flowery Gel Wax Candle:
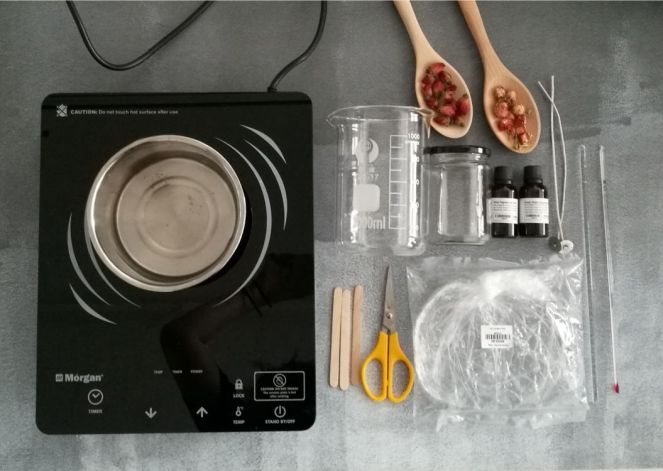
- Clear Gel Wax
 We used this High Density Clear Gel Wax – 500g !
 - Zinc Wick We used this Eco-6 Candle Wick – 8 Inches instead, BUT you might not want to as well, find out why at the [*Notes] section for Step 2 of Method 1.
- A Glass Jar We used this 350ml Clear Round Glass Jar with Black Cap.
- Honey Fragrance Oil
- Flower Water Fragrance Oil
- Dried Rose Bud We used this here.
- Dried Amaranth Globe Flower We used this here.
- Glass Thermometer – 200°C
- Glass Rod
- Scissors
- Popsicle sticks
- Elastic Band
- Double Boiler (for Method 1 only)
- Stove
- Heat Gun (for Method 2 only) We used a 2000w Ryobi Heat Gun
- Thick Cloth/Mittens (this is especially needed if you’re doing what we did at [Method 2].)
- Powder Free Latex Gloves (for those who hate washing their hands multiple times when handling gel wax)
Instructions
Method 1 – The Double Boiler (the BEST method)
1. Gel wax melts at 80+°C. For those who are impatient, make sure to break the gel wax into multiple smaller pieces to help speed up the melting process (do not stir while melting as this may introduce air bubbles into the gel wax!). The first time we did this, we broke them into three palm-sized pieces and that took more than an hour to melt.

2. While the gel wax is melting, secure a wick to your container. We recommend not using super glue, glue dots or hot glue as they may melt and cause your wick to float when you’re pouring in the melted gel wax. Instead, you can secure your wick as shown below:

*NOTES: Don’t use a wick that’s pre-coated with wax of any kind. A wax-covered wick will cause a cloud in the gel and it will not have a clear finish.
3. The gel wax is ready to be poured when it reaches around 94-104°C. Turn off the heat and add in your choice of fragrance oil. Here, we added 10 drops of flower water fragrance oil and 5 drops of honey fragrance oil for our 350g gel wax candle and the scent was strong.
*NOTES:
a) The colour of your fragrance oil can affect the colour of the gel wax.
b) Adding fragrance oil to wax above the flashpoint will not cause it to combust.
a) The colour of your fragrance oil can affect the colour of the gel wax.
b) Adding fragrance oil to wax above the flashpoint will not cause it to combust.
4. Stir well but gently with the glass rod so that the fragrance oil is evenly dispersed in the melted gel wax.
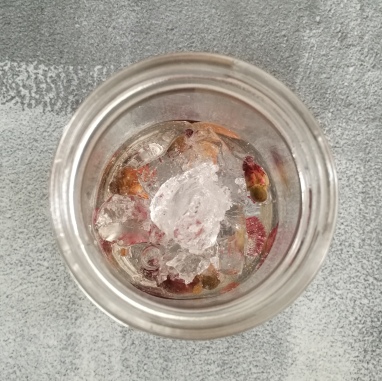
 5. Pour a little gel wax into the container, place some dried flowers on it, and pour another layer of gel wax. Do this until you’ve reached near the top of your container.
*NOTE: We don’t recommend pouring all the melted gel wax in first and then, pushing the dried flowers in to submerge them. This is because more fine bubbles will form and the flowers are more likely to float back up to the surface as well. (A picture showing the difference between layering and submerging the flowers can be found down below).
6. Snip your wick about 1cm taller than the gel wax. Then, let the candle cool and cure at one side for 1 to 2 days.
~*~

On the left: Result of Method 1. We used a wax-coated wick which resulted in cloudiness, and we also pushed the flowers in to submerge them which resulted in lots of fine bubbles.
On the Right: Result of Method 2. We don’t recommend this method to those who are making candles to be used and not just for decorative purposes. Our wick burnt and there are a lot of huge bubbles, though they do provide a nice visual.
~*~
Method 2 – The Heat Gun (quicker but not the best way, lots of bloopers!)
1. Like in Method 1, break the gel wax into small pieces. Make sure your wick is secured to your jar before filling the bottom of the container like so:

*NOTE: Make sure your jar can withstand high temperatures for this method!!
2. Melt the first layer of gel wax using a heat gun. Ours is of industrial strength and this was not a good thing because our wax-covered wick ended up burning. We’re not sure if a weaker heat gun would result in the same thing, though.

3. Add a drop of honey fragrance oil and flower water fragrance oil into the melted layer of gel wax. Gently stir to evenly distribute the fragrance oils.
4. Place some dried flowers on the melted layer of gel wax before placing a layer of un-melted gel wax on top of them. Ensure that the un-melted gel wax completely covers the dried flowers in order to avoid burning or darkening.
5. Repeat steps 3 and 4 until you’ve reached near the top of the jar.
6. Let the (non-)candle cool and cure at one side for 1 to 2 days.
*NOTE: We tried to pierce through the gel wax to insert a wick before we did step 6 but it just didn’t work out well.
This tutorial is honestly a mess but we couldn’t not share what we’ve learnt through our trials and errors with you. We’ll do an upgraded tutorial on the Sweet and Flowery Gel Wax Candle using Method 1 only, so please keep an eye out for that! 

Pssst, we're also available at Craftiviti.com!
No comments:
Post a Comment