Saturday, October 26, 2019

DIY Melt and Pour Anti-Acne African Black Body Soap


Originated from West Africa, African Black Soap is traditionally hand-made using methods passed down through generations, using recipes that are centuries old. It’s a brilliant soap packed with antioxidants, vitamins A and E, fatty acids, and more, because of the plantain and palm leaves, banana bark, cocoa pods and shea butter. This makes it a ‘holy grail’ soap for us skincare enthusiasts!
So, what can African Black Soap do? It can…
  • balance skin moisture levels without making it oily
  • nourish skin
  • heal skin problems like acne, eczema, and psoriasis
  • fade skin discolorations and reduce hyperpigmentation
  • relieve dry and irritated skin
  • even skin texture and tone
  • deep cleanse for skin
  • natural exfoliation for skin
In fact, there’s a study by the Albert Einstein College of Medicine which found that over 90% of African black soap users who were a part of their study, reported to being satisfied with their improvement in acne, eczema, and general skin quality!
PS: It’s important to buy authentic, raw African Black Soap. There are “black soaps” in the market which contains artificial ingredients, thus they won’t give you the same results as authentic, raw African Black Soap.
For this recipe today, we’ll be using Stephenson Personal Care’s Crystal African Black Soap (click here for more info!) base which is a completely natural Melt & Pour soap base “made using Raw African Black Soap from Ghana.”
bty
What You’ll Need:
  1. Stephenson Personal Care’s Crystal African Black Soap Base
  2. Calendula Infused Oil (made following this tutorial, or you can just get our 100% Calendula Oil if you prefer something quicker!)
  3. Tea Tree Essential Oil
  4. Lemon Essential Oil
  5. Silicone Mold 👉 We used this Large Rose Soap Mold here!
  6. Double Boiler
  7. Measuring Spoon
Instructions:
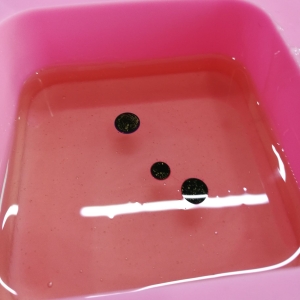
  1. Cut 500g of soap base and melt it in a double boiler.
    bty
  2. Turn off heat when melted and add up to 1ml of Calendula Oil, 10 drops of Tea Tree Essential Oil and 10 Drops of Lemon Essential Oil into the melted soap base. Stir well.
  3. Pour the melted soap base into a silicone mold.
  4. Set aside for 4-6 hours so that it can fully harden. You can use the soap immediately after!
bdr
Pssst! You can also use this soap just as it is!

happy crafting
buy it
Reference:
  1. Lin, A., Nabatian, A., & Halverstam, C. P. (2017). Discovering Black Soap: A Survey on the Attitudes and Practices of Black Soap Users. The Journal of clinical and aesthetic dermatology10(7), 18–22.

Friday, October 18, 2019

Flashback Friday – 5 Times Juniper’s Journal Talked About Us


Recently, we noticed another amazing person (a.k.a. Juniper of Juniper’s Journal) who talked about us on their blog and we are so so delighted and thankful that her experience with us was just as amazing as our experience with her.
Junipers Journal Craftiviti Blog Feature
All her posts on us (click on the individual titles to read each post!):
  1. Craftiviti Is A Craftmaker’s Paradise From Amateur To Artisan Level
  2. Craftiviti Workshop : Handmade Lotion
  3. Craftiviti Workshop : Melt & Pour Soap
  4. Craftiviti Workshop : Foaming Bath Butter
  5. Ruby Red Face & Body Paint Available At Craftiviti

Thank you so much for featuring us Juniper!
happy craftingbuy it

Monday, October 14, 2019

How Plant Powders Are Made


In forms like extracts, oils and powders, plants have always been incorporated in skincare. For instance, rose is popular for being antibacterial, anti-inflammatory, and having antioxidants—usually infused in products meant to fight acne, reduce redness, boost moisture in skin. Orange is added for it’s richness in vitamin C which helps to even out your skin tone, and aloe vera is a known healing plant.
There’s also ginger root which can help stimulate blood circulation, and pine bark extract with it’s ability to increase hydration and elasticity of skin. So, it’s clear that when used in the right way, plants can do wonders for our skin!
Natural oraganic homemade soap making
For today’s blog post, we’ll be talking about how plant powders—one of the forms in which plants are incorporated into skincare—are made. Like how there is a variety of plant powders, there’s also a few ways to produce them.
~ * ~
moringa_powder1. Grinding into Fine Powder
Powders like green tea powdermint powder and moringa leaf powder are made using the leaves of their plant which has been dried and then, ground into fine powders. This is also how some ginger root powders, flower powders (like lavender, rose, calendula, etc.) and a few others are made.

fresh cassava and peels and slices on rustic wooden table
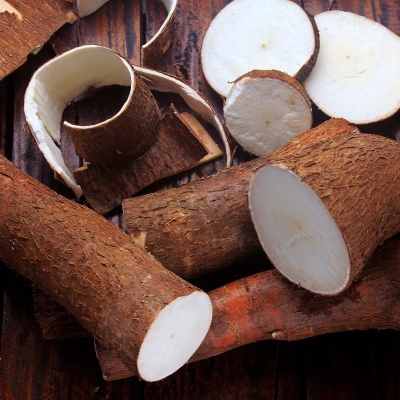
2. Starch Production
Certain plant powders like arrowroot powder are actually starch. These plant powders are made by separating the starch from plant root which has been cut and mashed into pulp. This pulp is strained through a screen to obtain fine starch which is then, dried and ground into fine powder.

3. Spray Drying
organic_strawberry_powder
While some powders like lemon powder and beetroot powder can be made by grinding the rind (for lemon) or the entire root (for beetroot), there’s another way for these powders to be made and that’s spray drying. This process involves spraying concentrated fruit juice in a chamber with hot air, allowing the droplets to dry before the dried particles are separated and filtered. Some of Craftiviti’s plant powders that are created through this process are Organic Lemon PowderOrganic Strawberry Powder and Organic Mango Powder.
~ * ~
Among the three, it can be said that plant powders made using the spray drying and grinding processes would hold the most nutrients and are therefore, more beneficial to us. However, this doesn’t mean that plants powders that are essentially starch, aren’t beneficial at all. All plant powders have their own pros and cons. So, depending on which formulation they’re incorporated in, they can either give your DIY personal care products a boost, or not.

Thanks for reading! We hope this helps ❤️

happy crafting
buy it

Thursday, October 10, 2019

Flashback Friday – Female Magazine Featured Us!


On the 18th of September, Female Magazine (a.k.a. Malaysia’s leading fashion & beauty magazine) featured us in one of their articles and we’re tickled pink!
female magazine
You can read the full article here!
Also, if you’re in Malaysia, near Petaling Jaya and would love to be a part of any of our craft workshops, head over here to see what we have and book your spot as well ❤️

Thank you so much for featuring us Female Magazine!
happy craftingbuy it

Monday, October 7, 2019

Berry Refreshing Natural Lip Balm DIY


Chapped lips aren’t a pretty sight, especially when the skin is peeling and there’s blood (ouch!). So, aside from drinking lots of water (don’t over-drink, though. Water poisoning isn’t pretty either), you give your lips a hand in the moisturizing department by applying lip balm 😍
Pssst, we’ve a printable recipe card for this one too, so grab it from down below!
bty
What You’ll Need:
  1. Beeswax 👉 We used Natural Refined Beeswax Pastille (USA) here!
  2. Refine Shea Butter
  3. Sweet Almond Oil
  4. Refined Coconut Oil
  5. Pomace Olive Oil
  6. Peppermint Essential Oil by Yein & Young
  7. Mixed Berries Lip Balm Flavor
  8. (Optional) Craftiviti’s Lip Liquid – Red 👉 You can choose among various shades of red, but our go-to is Red 21.
  9. Glass Pipette
  10. Metal Scoop/Glass Beaker
  11. Cooking Pan/Pot
  12. Glass Stirrer
  13. 5 Lip Balm Tubes (5ml each)
  14. Kitchen Scale
Instructions
  1. Add 2 tbsp of Natural Refined Beeswax Pastille and 1 tbsp of Refined Shea Butter in the metal scoop/glass beaker.
  2. Place the metal scoop/glass beaker over a pan of water on a stove, and melt the contents. Stir occasionally to make sure the contents melt evenly.
    Berry Refreshing Natural Lip Balm DIY (1)
  3. Once melted, add 1 tbsp of Sweet Almond Oil, Refined Coconut Oil, and Pomace Olive Oil. Stir until it’s evenly blended.
  4. Remove the metal scoop/glass beaker from the pan.
  5. Add 5 drops of Mixed Berries Lip Balm Flavor, and 2 drops of Peppermint Essential Oil. Stir to blend.
  6. (Optional) Add in up to 5 drops of lip liquid to give your lip balms a light tint! Stir to blend again.
    Berry Refreshing Natural Lip Balm DIY (2)
  7. Pour mixture into lip balm tubes. Set it aside for it to harden and cool before capping the lip balms.
    *Note: Make sure that your lip balm containers are screwed all the way down before pouring your mixture in, or you’ll end up with short lip balms!

Craftiviti Recipe DIY Instructions 2-Berry Refreshing Natural Lip Balm

happy crafting
buy it

Thursday, October 3, 2019

We Got Featured by The Star!

It’s a super exciting day at Craftiviti because an article on Craftiviti's founders by The Star was released yesterday!


the star malaysia craftiviti craft store therapeutic crafts personal care diy
You can find this article on 3rd October 2019’s print edition of The Star’s newspaper.

Here’s two of our favorite quotes (a.k.a. words of wisdom 😉) we picked from the newspaper:
Yein Craftiviti Quote The Star Newspaper (2)
and
Yein Craftiviti Quote The Star Newspaper (1)

You can also read the online version of this article here!

Thank you so much for featuring us The Star!
happy craftingbuy it

Tuesday, October 1, 2019

We Tried Making Resin Petri Dishes and Well…This Happened


Created by Josie Lewis, the Petrified Rainbow (also known as Resin Petri Dish and Resin Coasters) is a gorgeous, unpredictable type of resin art where a rainbow (or any other mix of colors used) is frozen in motion in a petri dish made of resin.

Awed by its beauty, we decided to give it a go and scoured the Internet for tutorials. Fortunately, our favorite site on all things resin art acrylgiessen.com has a tutorial just for Resin Petri Dishes! We got to work, setting aside the necessary tools and materials for this experiment but we hit a snag with every try and learned an important lesson:
Just like how not all epoxy resin is made equal, not all alcohol inks are made equal as well.
We used two types of Epoxy Resin for our attempt to make Resin Petri Dishes—the first is our own brand of Clear Epoxy Resin, and the second is Alumilite’s Amazing Clear Cast Epoxy Resin. For alcohol inks, we used Semiramis’ Alcohol Inks.
As noted by acrylgiessen.com, if the alcohol ink spreads immediately after being dropped into the resin, then the resin is pretty fluid. If it doesn’t spread much, then the resin has started to cure slightly. Unfortunately, this isn’t the case for both of the epoxy resin we used.
IMG_20190920_125610
As you can see in the above picture, despite us immediately dropping ink into our resin after we’ve combined the resin and the hardener, it appears that our epoxy resin is too thick for our alcohol ink to penetrate it. We did the same for Alumilite’s and our alcohol ink couldn’t penetrate it as well.
So, in effort to save it, we mixed the resin with the alcohol inks and attempted to created petrified clouds of gold using a mixture of our 99.8% Isopropyl Alcohol and Aztec Gold Mica. The mica powder + Isopropyl Alcohol combo worked well!
IMG_20190920_125613
IMG_20190927_173544
We also noticed that despite using the same amount of alcohol ink (10 drops) and mica+isopropyl alcohol (10 drops), the intensity of the color differs between the two brands of Epoxy Resin. Semiramis’ Alcohol Inks are brilliant for coloring epoxy resin
IMG_20190927_173610
Top – Alumilite       Bottom – Craftiviti
Though, we did keep one (using Craftiviti’s Clear Epoxy Resin) as it is with the un-mixed alcohol inks as a reference. The Epoxy Resin cured completely in 24 hours, but the alcohol ink never dried. We left it aside for a few more days but it stayed wet!
IMG_20190927_173720
Afterwards, we added another layer of Epoxy Resin just to see what happens and well, the result is a (rather pretty) bleeding Epoxy Resin sandwich 😂
So, as with all art and crafts, it’s always best to do little tests first. Don’t go full-on until you’re sure that a technique will work!
That aside, just because we failed this time, doesn’t mean that we’re going to stop trying! Stayed tuned for when we finally figure out a tutorial for Resin Petri Dishes that won’t fail 💪

Have you tried making a Resin Petri Dish before? How did it turn out for you? We’d love to hear about your experience and thoughts down below!
Thanks for reading ❤️
happy crafting
buy it

JOIN US ON FACEBOOK