Wednesday, November 19, 2014

CRAFTING WITH EPOXY RESIN

We have received may enquiries about resin so we've done up this post. Hope it helps. 

Resins are fascinating materials so we are glad you asked. They can be used to cast figurines or objects, as a coating for craft pieces, to encase images or items such as flowers or tiny intricate objects, or to mend broken objects. 

At Craftiviti, we have two types of resins: Epoxy Resins and Polyester Resins.

Polyester Resin
Polyester resin is slightly opaque and does not have the clarity of Epoxy Resin. Polyester is also quite toxic in nature so a well ventilated working area and a good mask is advisable when working with this material. Polyester Resin can be used to cast larger objects and is much cheaper to work with compared to Epoxy Resin. It is sold with a hardener which helps the resin cure and harden. Unlike Epoxy, polyester resins only need a few drops of the hardener to work it's magic. 

Epoxy Resin
Many crafters love to work with epoxy resins simply for its crystal clear effect. Unlike polyester resin, epoxy resin is non-toxic and does not give off poisonous fumes. The cured resin is very hard, durable and safe to use. It is perfect for embedding flowers, photographs and just about anything else. Epoxy resin also needs a hardener or catalyst to cure. The ratio of resin to hardener depends on the product instructions. For our epoxy resin, a ratio of 2 parts resin to 1 part hardener is required.\

People who enjoy making miniatures sometimes use resin to simulate water when creating beach and ocean scenes. Smaller amounts of resin can be used to design replicas of soups, liquid drinks, and fishbowls. Jewelry makers use epoxy resin to create necklaces, pins, bangles, bracelets, earrings, and rings that feature embedded glitter for a fun effect.


When compared to other traditional thermoset or thermoplastic resins, epoxy resins have distinct advantages, including:


  • Low shrink during cure
  • Excellent moisture resistance
  • Excellent chemical resistance
  • Good electrical properties
  • Increased mechanical and fatigue strength
  • Impact resistant
  • No VOCs
  • Long shelf life
Types of Epoxy Resin available
1) Clear Epoxy Resin - Clear flat casting
2) Soft Epoxy Resin - Flexible coating for stickers or flat surfaces
3) Doming Epoxy Resin - Hardens with a slight dome like a water droplet


Materials needed while working with Epoxy Resin
- Disposable measuring cups
- Digital scale
- Disposable stirring sticks
- Items for embedding
- Silicone Release Agent
- Mold


Instructions

1) Epoxy resin can be measured by weight or volume. Before measuring, give the resin a stir and the hardener a good shake.

2) The ratio of 2 parts resin to 1 part hardener must be followed to other wise, curing will not happen. For example: 200g Epoxy Resin, you will need 100g hardener. Or 1 cup resin, half cup hardener. 

3) While pouring the resin into the measuring cups, do so slowly so as to avoid bubbles. Tap the cups to release the bubbles to the surface. 

4) Pour the hardener slowly in to the resin and mix well. Curing will not happen is the mixture is not well mixed. 

5) Spray a layer of silicone release agent such as Weins Silicon Release Agent into the mold. This helps demold the cast once the resin is cured. 

6) Slowly pour resin into mold or onto objects you would like to embed. Tap mold on the sides to release bubbles. You can also scope the surface bubbles out or prick them with a needle. You can also spray a thin layer of rubbing alcohol on the resin surface to help disperse the bubbles.

7) Resin will take 2 to 4 hours to fully cure depending on the thickness and size of the casting.


Epoxy Resin storage life
When kept separate from hardener, epoxy resin has a long shelf life. Store both resin and hardener in a cool, dry area. And always make sure the can is tightly shut. 

Cleaning up Epoxy Resin
For spillage or to clean up utensils, use Acetone, rubbing alcohol or any nail polish remover. 


Molds for Epoxy Resin
Silicone or latex molds are best for Epoxy Resins as the resin will not stick to the mold and demolding is easy. 

You can make your own silicone molds with our RTV Silicone Rubber or with Smooth-On mold making materials. 

For other molds such as plastic molds or trays, first spray on a layer of Silicone Release Agent to avoid sticking.  


Embedding paper or images
If you would like to embed photographs or paper designs, it is best to seal your paper first. We recommend using Supergloss or White Modelling Glue. Coat the paper or photograph on the top, bottom and even on the sides to seal it. This will prevent the resin was seeping into the paper and turning it translucent. 


Pigments and Dyes
To tint the resin, you can use Mica's and resin pigments and dyes which we carry in store.
Visit us at Craftiviti retail craft store or you can buy online here.

Tuesday, October 28, 2014

LUMI INKODYE FABRIC PRINTING KITS

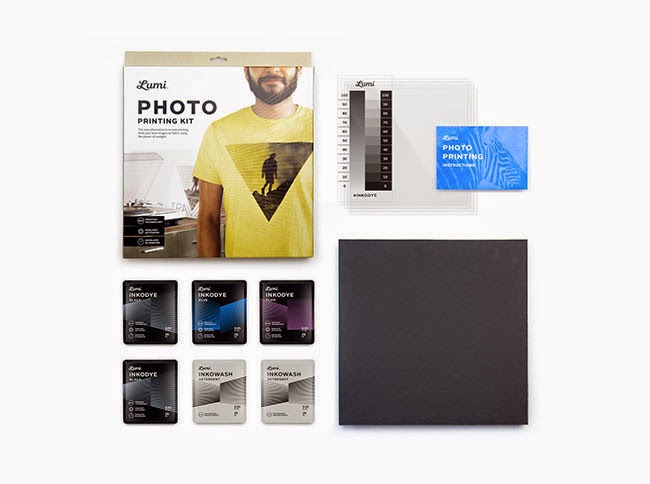
LUMI PHOTO PRINTING KIT

The easiest to get started with Inkodye.
Print your own images on fabric using the power of sunligh. 

Comes with:
4 x Inkodye 0.05oz Snap Packs
(2 x Black, 1 x Blue, 1 x Plum)
2 x Inkowash packets
4 x Inkofilm 8.5" inkjet-printable film
Printed instructions
Project board (12 x 12")
Test negative
RM180


LUMI SHADOW PRINTING KIT

Printable canvas pouch (8x4")
Inkodye Orange 0.95oz Snap Pack
Inkodye Magenta 0.95oz Snap Pack
Inkowash packet
Printed instructions
Acrylic overlay
RM129


Monday, October 27, 2014

LUMI INKODYE NOW AVAILABLE @ CRAFTIVITI


We just brought in a new product into Craftiviti and we are so excited over it.

LUMI Inkodye must be like the coolest way to print on fabrics. It's just so easy and so fast (only takes 10 minutes in the sun). AND it's permanent - like FOREVER!

While we haven't had the time make our own samples, we found some wonderful projects online here.

Loads of people all over the world have been using LUMI to print on T-Shirts, shoes, bags, even on sofas, chair bases, cushions and more. It can be used on anything porous: on wood, leather, canvas, paper and more.

Here's a quickie on how Inkodye works:

STEP 1 - Apply Inkodye onto your cloth, wood, paper or any other material you want to print on. The Inkocap Roller helps with this application to make sure the ink is layered consistently. This also helps save ink too. 

STEP 2Prepare your negative by reversing any image and printing it on an inkjet film. You can also use Lumi App here. 
(Images that contain copy may not be suitable since copy will be reversed)

If you prefer not to use negatives you can also use objects such as paper cutouts, lace or even leafs to selectively block light from activating Inkodye. 


STEP 3Inkodye develops its color in sunlight or bright UV, about 10 to 20 minutes on a bright day.

And because we are in the sunny tropics of Malaysia, we can make print almost every day of the year!


STEP 4 Remove the unexposed dye using Inkowash to make your print permanent.
Inkodye is a true vat dye, the most permanent family of dyes in the world. 

Vat dyes are known for their resistance to fading. Once printed, the color does not rub off, does not fade in sunlight and can even withstand bleach washing.

While permanent and strong, Inkodye is very safe even for children. 

Inkodye is designed for printing natural fibers such as cotton, linen, rayon and silk. Inkodye can also be used as a dye or paint to color almost any absorbent natural material:

  • Cotton
  • Linen
  • Silk
  • Muslin
  • Denim
  • Bamboo
  • Burlap
  • Wood
  • Hemp
  • Jute
  • Canvas
  • Leather
  • Suede
  • Wool
  • Mohair


LUMI Inkodye comes in 8oz bottles (RM88 per bottle). One bottle can make 10 to 12 prints the size of an A4 paper. There are two ways you can increase the quantity of prints:

1. Use Inkocap Roller (RM53) to reduce wastage

2. Dilute with water (however the ink colour will be less intense)


Inkowash is a 8oz (237ml) bottle (RM69) of specially-formulated strong detergent to rinse out unexposed Inkodye. It acts as a replacement for standard laundry detergent. Washes 10 laundry loads of prints.

To create negatives, we use ULANO. It's ideal for printing high resolution photography. RM65 for 10 sheets. Each sheet is good to make numerous printed copies. 


LUMI also comes in handy kits/sets (sunlight not included). It's the perfect gift for anyone. Even kids go pro with it too! 


Photo Printing Kit RM180
Shadow Printing Kit RM129


----

For further enquiries, write to us at enquiry@craftiviti.com
Or visit our outlets to have a look. 

Visit our website:
www.craftiviti.com


Watch this video
                  
                                      Lumi – Print with Light from Lumi on Vimeo.

Thursday, October 23, 2014

LUMI LAMPSHADE


We've been pretty psyched over LUMI Inkodye. This printing process is just so easy and so fast. Plus with the sunny weather in Malaysia, everyday can be a LUMI-making day. 

There are plenty of projects you can find online. Here's one on making your own lampshades.

Here's what you need. You need the Inkodye. Craftiviti carries Red, Blue, Plum and Sepia. You'll need a foam brush, some pretty lace patterns, a lampshade and some push pins. 
Pour Inkodye into a clean glass jar. You can add water to dilute the dye for a lighter effect. This also helps you save on the Inkodye so you can do more stuff with it. The Inkodyes can be mixed to create different colours!
Coat the lampshade with the Inkodye. Here they used an orange dye. There is no need to completely soak the lampshade with dye till it is dripping wet. With Inkodye you'll notice a little goes a long way. 
Next, pin on the lace. Work on this in a shaded cool area until you get it in the right position. Remember, Inkodye starts to show when it is exposed to light. So work as quickly as you can. 
Place the lampshade in direct sunlight for 10 minutes. Yup 10 minutes is all you need. 


Bring the lampshade back into the shade and remove the lace. Here you'll see places that are not covered will have changed its colour thanks to the dye. 


 Mix some Inkowash with hot water and wipe away. Don't be afraid to scrub at it hard to remove all access Inkodye. This step ensures the dye no longer reacts to the sunlight and continue to change colour.
From a simple inexpensive lampshade, now you have a customised design. 


See original article here.

For variations, you can also use photo prints. Check out Lumi.co for more project ideas. 

To purchase LUMI, you can write to us at enquiry@craftiviti.com. You can also purchase online at www.craftiviti.com or visit our store to find out more. 

Saturday, September 27, 2014

HOW TO ETCH ON GLASS

Glass etching is so easy it's a wonder why we don't do it more often.


To find out how to do this step by step, we found a site that does a pretty good explanation. Click here


 Etching cream slathered on the glass. All you need is 15 minutes for it to work it's magic. 


 Charlie the goldfish now has a bowl all to himself


At Craftiviti, we have the Etchall etching cream from USA but any other etching cream will do fine.
Etchall permanently etches glass, mirrors, ceramic glazes, tiles and more. 

We like Etchall because it is a reusable cream. This means that instead of whipping or washing the cream away after the process, you can return the cream back to the bottle and keep it for another project. 

Tuesday, September 23, 2014

HOW TO MAKE SOY WAX CANDLES

Candles are so easy to make you could make them before breakfast!

Here are some of the waxes you could try, all of which can be found in our outlets:

Soy Wax 
100% natural wax made from soybean. Environmentally friendly. Low soot. Longer burning time and long lasting scent retention. Candles have a milky smooth look. Can be used with fragrance and dyes.

Palm Wax 
100% natural made from Palm wax. Also called stearic wax. Creates beautiful crystalline structure on candles once hardens. Longer burning time. Long lasting scent throw. Affordable and easy to use. Can be used with fragrance and dyes.

Paraffin Wax
Made from petroleum by-products. Most affordable wax option compared to the rest. Hardens into a semi translucent form. Shorter burning time compared with Soy or Palm wax. Looks great when dyes are added to it. Can be used with fragrance  too.

Gel Wax
Made from petroleum by-products. Comes in a soft gel form. Used to showcase embedded seashells and other objects. Quick burning time. Can be used with fragrance and dyes.

Beeswax
Made from 100% beeswax. In its natural form, the wax is creamy gold. Most expensive option for wax. Longer burning time. Sweet natural scent but also works great with fragrances. Very natural and pure. 
Here are the list of ingredients used. We like working with soy wax or palm wax because it looks great once done. But if you prefer to work with other waxes, the steps are pretty much the same. 

What you need:
Soy Wax
Wicks
Essential Oils or fragrance oils
Alcohol BP
Glass jars
Wax dyes

How to pick the right jars for your candles
You can make candles in just about any glass jar you have. It is your wicks that need special selection. 

Wider jars require thicker wicks to ensure that the fire burns evenly. If the wicks are too thin, the fire tends to spiral downward creating a tunnel of wax instead of burning the wax evenly. 

If you don't have thicker wicks, try placing more wicks in the jar instead of just one. This helps keep the candle burning strong and covers all corners. 


All wicks must have a sustainer at the bottom or a metal clip. Secure the sustainer to the bottom of the jar with glue. Here we used E6000 all purpose glue. This helps ensure the wick does not move off the center of the jar or float when the wax is poured.  


Next, heat wax over low fire. Some people like to double boil their wax but we prefer direct fire as long as it is constantly being watched. 


Wax will begin to melt almost instantly. Here, the natural scent of the wax is very pleasing. 


Give wax a stir as it melts. 


This is what the wax looks like once it melts. If you notice sediments in your wax, that's completely natural. Once Soy Wax cools the sediments cannot be seen. But if you'd like to, you can always strain your wax before pouring.


Cut a small piece of the wax dye and drop it into the pot. Stir to mix. 

Using too much wax will affect the burning of the candle. Remember, a little dye goes a long way. Here we drop in some blue dye (around 2mm thick).


Pick your favorite fragrant. Here we used Lavender Fragrance. While we also have essential oils in our stores, fragrance oils works just as well.

Do allow the wax to cool to around 60 degrees before adding the oils. If the wax is too hot, the oils will tend to evaporate fast. 

You can always mix two or more fragrances together to create new scents. In fact lavender and peppermint make a create pair! 

How much fragrance to put in is totally up to you. Just take a whiff and add away to your liking. 


To keep the wick upright, we used a plastic clip.  Using a pair of chopsticks works just as well. 
Pour wax slowly into the jar. Be careful not to let the wax drip down the side of the jar. If it does, use Alcohol BP to wipe clean.


Here is our partially finished candle left to set for the night. 


This is what the candles look like the next morning. Notice how creamy and smooth the candle looks? The blue dye turns into a nice pastel blue. 


Now onto the second half of the process. Another batch of wax goes into the pot and this time purple dye is used.


Lavender fragrance is dripped in after the wax has cooled. 


To clean the edges of the candle or the side of the jar, use Alcohol BP. It's 97% pure alcohol great for cleaning molds and jars before and after the candle making. 


Leave candle to set over night.


And here's what the finish candles look like. Two layered milky lavender scented goodness! 
Trim the wick and light away!

We also have Vybar or Candle Wax Additive for those who would like to make harder candles with longer scent throw. 

For further enquiries, write to us at enquiry@craftiviti.com
Or visit our outlets to have a look. 

Visit our website:www.craftiviti.com


Join us on Facebook 


JOIN US ON FACEBOOK